

Are you looking to one-up the neighbors with your pumpkin carving skills? Then you need to think outside the little $2.99 pack of pumpkin carving tools. The other night I decided to try pumpkin carving with the RYOBI Rotary Tool Station. I’m going to tell you all about the experience and walk you through the steps of this fun way to carve a pumpkin – even if you’re a beginner!
Spoiler alert: It was awesome!
RYOBI Pumpkin Carving Guide
- About RYOBI Rotary & Craft Tools
- Process
- Outcome
- RYOBI Rotary Tool vs Dremel
- Final Thoughts
- FREE Pumpkin Carving Stencils
About RYOBI Rotary & Craft Tools
RYOBI has made a name for itself in the niche market of specialty hobby and craft tools. I believe this started with the release of the RYOBI 18V ONE+ Cordless Hot Glue Gun in 2016. Since then, a lot of brands have released their own cordless glue guns, but RYOBI has gone on to create a diverse selection of different craft and hobby tools they call HOBBY+MAKER on their website. RYOBI is exclusive to The Home Depot, and if you search “RYOBI craft tools” on The Home Depot site you’ll get 1,852 results!
These craft and hobby tools by RYOBI range from glue guns, to soldering irons, to power cutters and carvers, sanders, and more. Most of the tools are part of the RYOBI ONE+ 18V lineup but also include some RYOBI 12V battery and USB rechargeable hand tools.
Now a little bit about the RYOBI ONE+ 18V Rotary Tool Station Kit. I believe it was released in 2022 and it’s marketed as the “quietest rotary tool in its class”, yet offers variable speeds of up to 35,000 RPM. This kit also comes with 36 different rotary tool accessories and a storage case.
Check out more specs and features below.
RYOBI 18V ONE+ Rotary Tool Station Kit
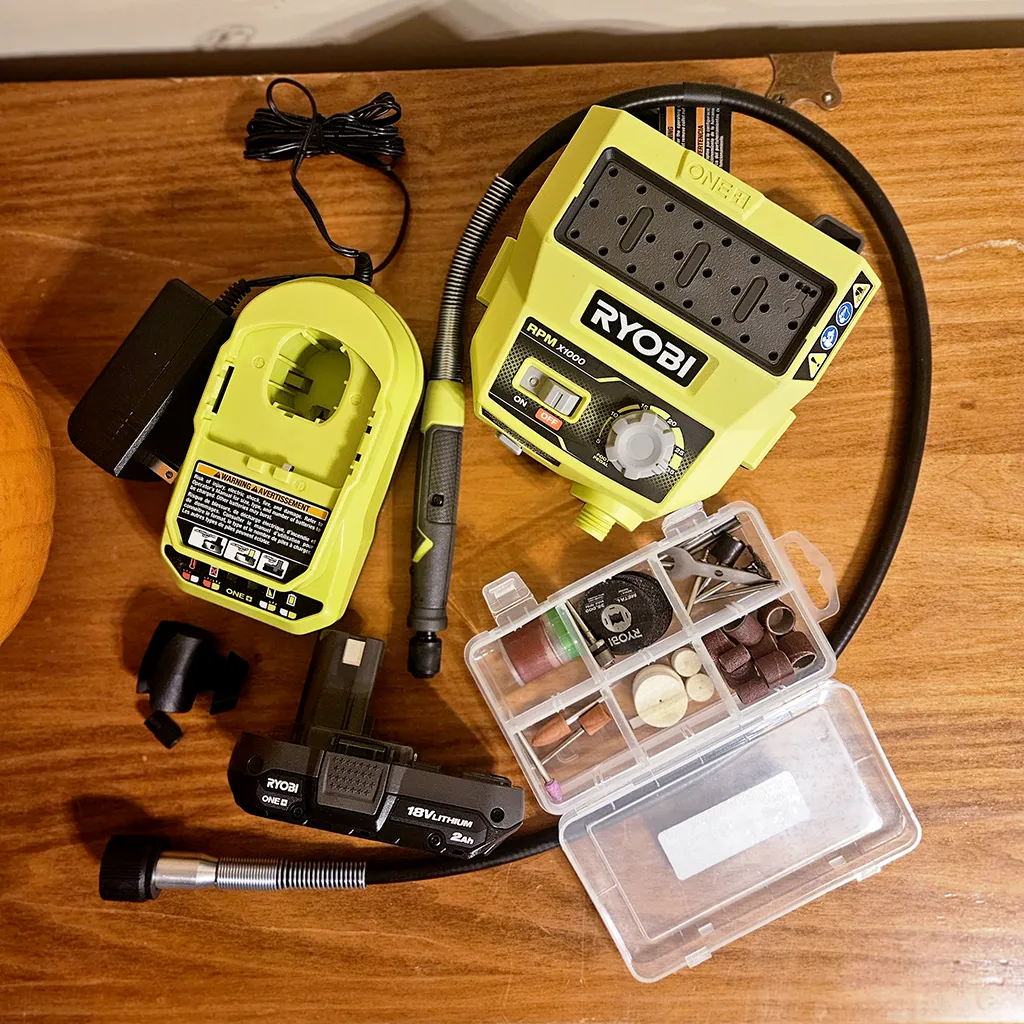
- Model #: PCL480K1
- Highlights: Variable speed trigger offers speed of 5,000 – 35,000 RPM, quietest in its class, built with a 36 in. flexible shaft pen that is easy to maneuver, and quickly and easily switches between 35 included accessories with the new Quick-Change Collet.
- Accessories: 35 included rotary tool accessories designed for grinding, cutting, sanding, and polishing, plus a wrench for secure accessory changes.
- Price: Sets without a battery start at $53.99; sets with a RYOBI 18V battery start at $95.
- Where to Buy: The Home Depot & Amazon.
More TIA Articles on RYOBI Craft Tools
- #NTN: New Tools at The Home Depot from Milwaukee, RYOBI & RIDGID
- #NTN: RYOBI Adds Power Carver to Craft Tools Lineup
- RYOBI 18V Glue Gun Model P305
- RYOBI is at it Again – New Tool Release
Process
A couple fun facts about me and carving pumpkins. 1) I hated carving pumpkins as a kid and this was the first time I carved a pumpkin in decades, and 2) this was my first time using a rotary tool.
Because of this I broke the pumpkin carving process into three parts, along with some of my thoughts and opinions about the methods along the way.
How to Carve a Pumpkin

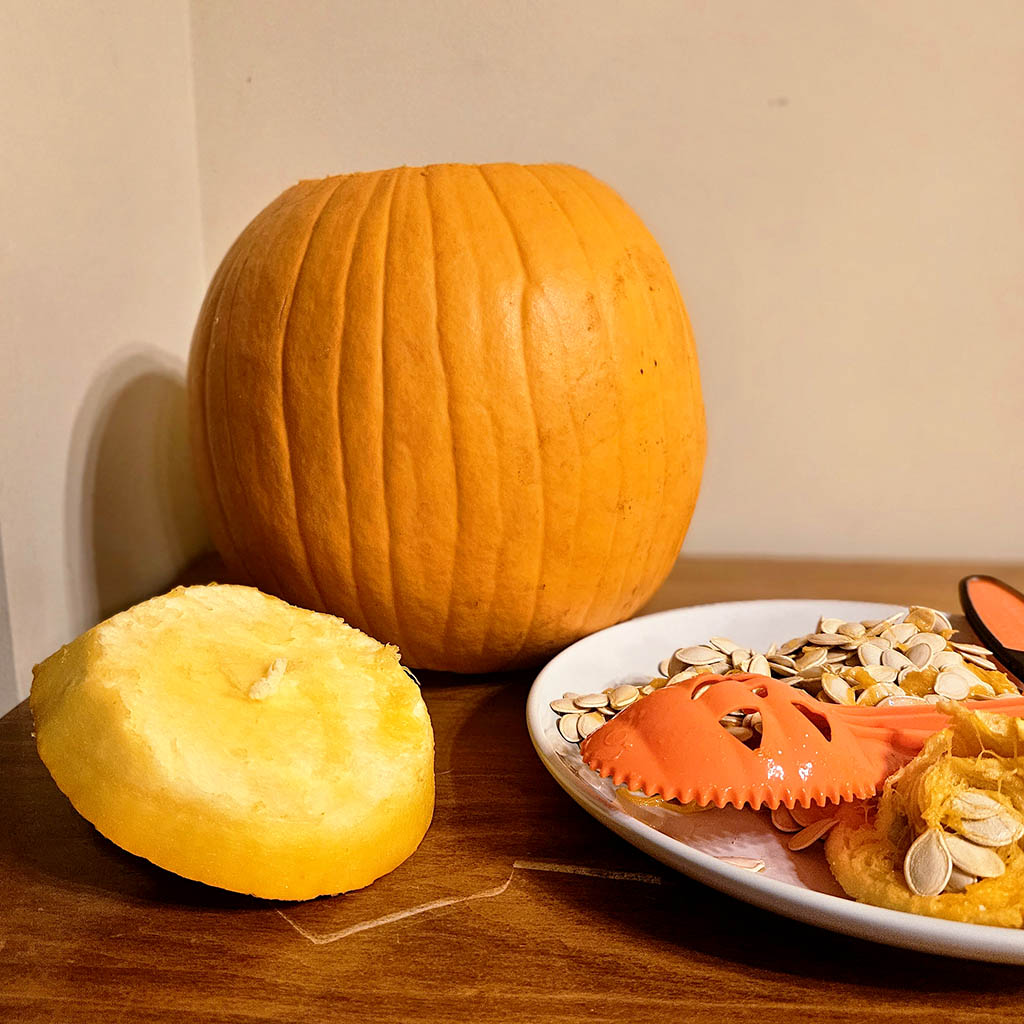
Alright, this doesn’t need much instruction. I recommend you pick a medium to large pumpkin with a relatively even surface that is easy to work on.
From there, buy one of those $2 to $7 pumpkin carving kits and when you get home use it to cut a large hole around the stem to make the lid. You’ll pull out the lid by the stem and with it a bunch of pumpkin fibers with seeds attached (AKA “guts”) should come out with it. I just pulled mine off and set it aside. More “guts” are inside the pumpkin. Your kit should include a pumpkin scraper. Use it to dig the guts out until the inside walls are smooth.
Bonus tip: Wash the fibers off the seeds using a colander. Allow the seeds to dry and then use them to make roasted pumpkin seeds.
How to Use Your Pumpkin Carving Stencil
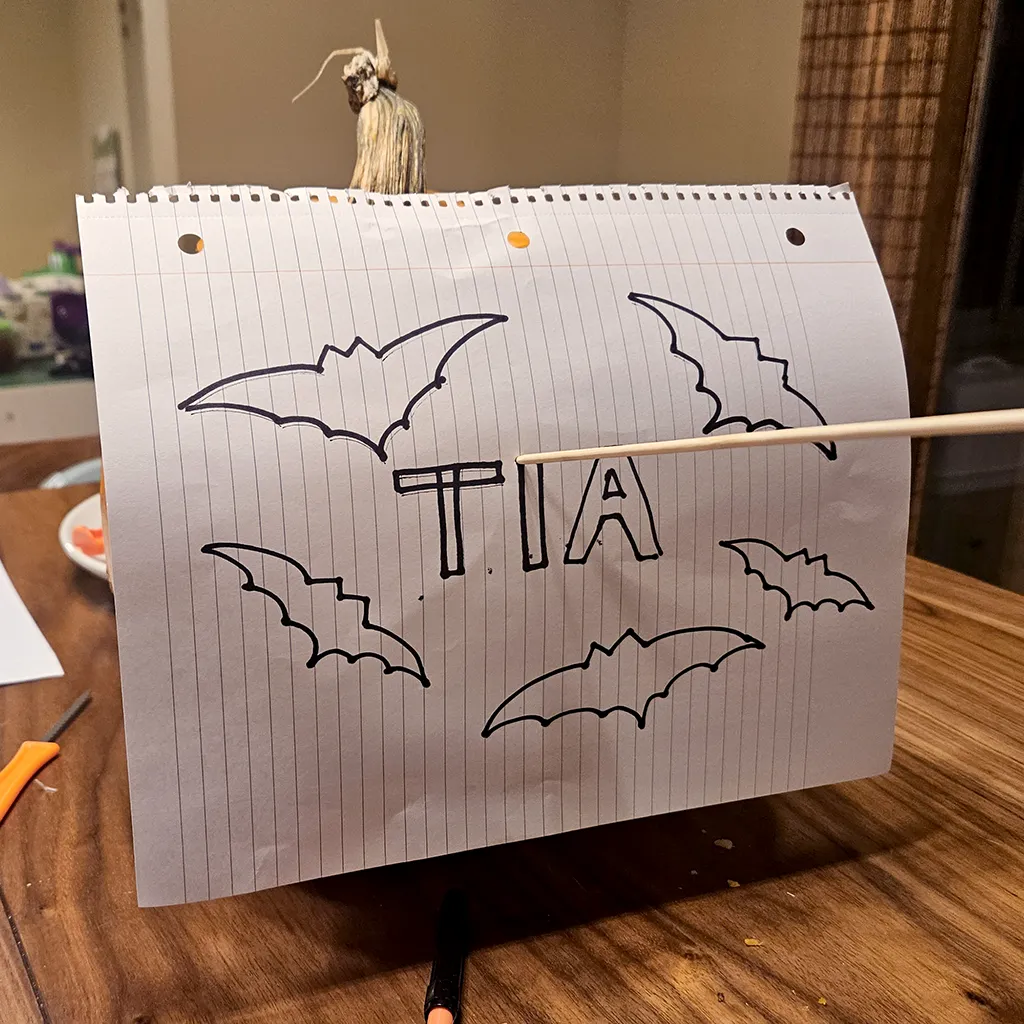
Your pumpkin carving kit may have come with a few stencils, there are also a lot of free stencils available online. Find one you like or print out one of the FREE pumpkin carving stencils we found. Or you can even make your stencil, which is what I did. I just drew my design on some notebook paper.
I positioned my stencil on my pumpkin and secured it with some masking tape. I was out of toothpicks, so I used skewers to punch little marks along the outline of my design. Just poke into the skin, you do not need to pierce it all the way through the wall of the pumpkin.
I’ll admit it. I did this because my husband told me to. I would have preferred to go with my first instinct to draw on the pumpkin since this was my own design. But this method worked well.
Remove your stencil once you have finished outlining your design with a toothpick, skewer, or other pointy object.
How to Use the RYOBI Rotary Tool
Before you start, I recommend grabbing a damp paper towel or cloth to use as you go.
All you need to do before using your RYOBI Rotary Tool is…
- Charge your RYOBI 18V battery.
- Connect the battery to the RYOBI Rotary Tool Station.
- Put on your preferred RYOBI Rotary Tool accessory.
- Turn the variable speed dial all the way down.
- Hold onto the base of the rotary tool pen with your dominant hand, hold it away from any surfaces and skin as you turn it on.
- Hold the rotary tool like a pencil and start tracing the outline on your pumpkin with the tip of your carving attachment. Start slow and increase the speed as needed. For thicker lines, continue to trace along the edge until you’re happy with the thickness. For this method, I recommend not carving all the way through the skin.
- Use the damp paper towel or cloth to wipe away loose pumpkin fragments as needed.
- Continue Steps 6 and 7 until you are done carving out your stencil outline.
Note: For considerably thicker lines, like my “TIA” lettering, you can change out the attachment for one that creates a thicker line. However, the lettered area was small enough so I just used the same attachment throughout.
The Result?
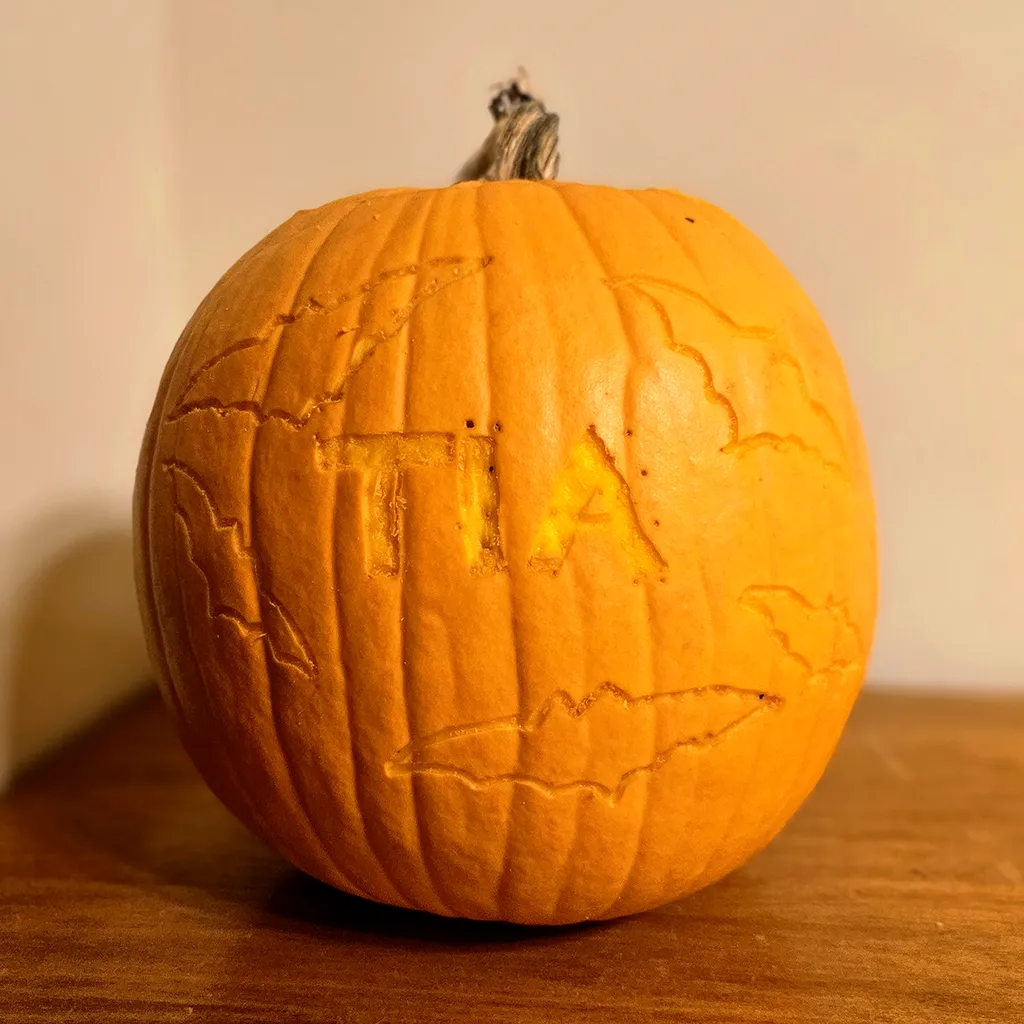

Overall, I’m happy with how this turned out. It also went very quickly. I think I spent more time outlining the design than actually carving it out. I’m definitely going to do this again and try out different rotary tool accessories as well.
Advantages of RYOBI Rotary Tool
Alright, you’re probably asking “Do I have to use a RYOBI Rotary Tool for this pumpkin carving project?” No. You can probably use any rotary tool, especially since this project works great on a low speed setting. I had a RYOBI Rotary Tool so that is the rotary tool I chose.
But why did I decide to use a rotary tool? As you can see in the process, I did not want to pierce the pumpkin skin. Instead, I wanted to shave off the surface. I like how this method allows the candle to give an even glow throughout the pumpkin. It’s also an easier way to carve things like the letter “A” or other letters and shapes that have details inside that you don’t want to lose.
So, in summary: The advantages of pumpkin carving with the RYOBI Rotary Tool are that it’s an easy way to shave (or carve) layers of the pumpkin without going all with way through the pumpkin wall, and to create finer detailing. It was also pretty easy as a complete beginner.
Disadvantages of RYOBI Rotary Tool
One thing I found difficult with this rotary tool was that it felt heavy after a while. However, I don’t think the weight of the tool was completely to blame. Because the flexible shaft pen is connected to the rotary tool station I felt like this pulled the rotary tool towards the station and I had to continuously pull against it.
It wasn’t unbearable, but was a bit fatiguing after a while. I felt like this could have been avoided if I had a small side table. However, placing the station on my kitchen table was too high and placing it on the ground was too low, and the pen was pulled in whichever direction I placed the station.
I’d like to try this again with the ability to place the station somewhere in between. However, a cordless rotary tool might be the best option. The Home Depot has a few RYOBI cordless options.
Final Thoughts on Pumpkin Carving with the RYOBI Rotary Tool
In the end, I was incredibly satisfied with how my pumpkin turned out and that this is a great beginner rotary tool project. Pumpkin skin is much softer than wood or metal which you would typically use in a rotary tool project. Because pumpkin skin is so soft you should go with a lower speed setting, and a low speed is much easier to control especially as you get the hang of using the rotary tool.
All-in-all, I think this method is great. My kids are too young, but I think this project is great to use with older kids, and is actually a great first project before moving on to more advanced woodworking crafts.
FREE Pumpkin Carving Stencils
Want to try it out? Grab a rotary tool and one of these FREE pumpkin carving stencils.
