Overview of the Burgess Router Bits
You might be asking yourself what is Burgess and what is so special about these router bits. Well let’s take one at a time. The Burgess router bit system was developed by Michael Burgess, hence that is where the name came from. The router bit system is designed for edge banding. Edge Banding, in the simple form, is a way to make the edge of plywood look like a different type of wood, such a Maple or Oak.
There are a couple of reasons you would want to do this. First, to save money. Instead of using an expensive hardwood for a cabinet or other project, you can use Plywood. Another reason could be the weight. Hardwood tends to be very heavy because of how dense the wood fibers are. Plywood is lighter and easier to work with. Plywood is also very strong because of the design. It tends to resist cracking, warping and twisting. These are only a few of the reasons why someone would want to use Plywood. One downside to Plywood is the edges. If you look at Plywood from a side view, you can see all the layers of wood. Now sometimes the side layers look very neat if stained the right way, but if you want it to appear as hardwood, the layers of wood are very hard to conceal. This is where the Burgess system comes into play.
You might be wondering, “aren’t there other ways to hide the side of Plywood.” Yes, there are other ways. You can glue Veneer to the side of plywood or you can glue a piece of hardwood to the side of the Plywood. However, there is a problem with both methods. If you Glue Veneer to the side of plywood, it can be a pain, but the biggest disadvantage is you can not round the sides. So you are stuck with the flat side. Also, Veneer will hold tight to the Plywood, but as you will see, not as tight as you can with the Burgess system. As we noted you can glue a piece of real hardwood to the Plywood, but again there are disadvantages. One disadvantage is the glue area or surface area. It doesn’t always make for a good solid edge band and can become loose over time. The plus is you can router the side to anyway you want. But on the other hand, you might only want the look of hardwood on the front of the cabinet and not the sides. With this method, you will see the hard wood on the front edge of the Plywood, but if you like the Plywood veneer on the sides, you loose this capability.
The Burgess system is a great system and takes away all these disadvantages we talked about above. You get a large surface for a glue hold, you can still have the real hardwood on the front edge of the Plywood and still have the Veneer look on the side of the Plywood.
The Review
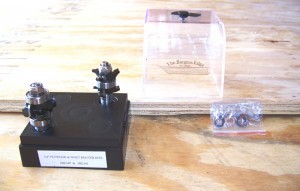
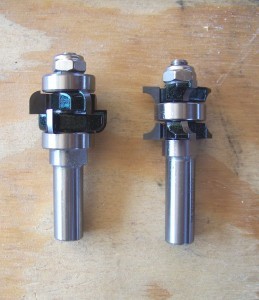
As you can see from the picture above, there are two router bits in this set, Plywood bit and the Insert bit. The Plywood bit creates the groove in the Plywood, while the insert bit cuts out the wood you want to insert into the Plywood to give it a different edge. The router bit system comes in a hard plastic case with both bits and the shims. The shafts are 1/2″. In order to add shims, all you have to do is loosen the nut and add shims to get the perfect cut.
We grabbed our 3/4″ scrap Plywood to test out the bits. You will need to use some scrap plywood in order to get the Plywood bit set for the proper cut. This does take a little work to get a good cut. Overall, it took us about 5-10 minutes to get the perfect set up where we had just enough shims so when we ran the router over the plywood, all that was left was the Veneer on both sides of the Plywood.
Once everything was set up, we could cut away. The great thing about the Burgess Edge is it doesn’t require a router table, you can do all this free hand. So if you are working with large sheets of Plywood, you don’t have to try and handle this through a router table, just grab your router and start cutting. As you can see by the video, the Plywood bit cuts a concave groove along the Plywood and leaves the veneer in place. When we started cutting, we thought two things might happen. First, the Veneer would be a little damaged by the router bits. Second, we thought the veneer might get caught up in the router bits. To our amazement, neither happened. The Veneer looked perfect.
Once we cut through the Plywood, we inserted the Insert bit into the router for our hardwood. The Insert bit cuts a matching convex shape into the hardwood. The great thing about this is once you make your cut with the Insert bit, you have complete control. If you want your insert to be flush with the Plywood edge you can do this. If you want the insert piece to stick out 2″, you can do this also. After you cut the insert piece with the router, all you have to do is run the insert piece of wood through your table saw and you can make your adjustments for how much you want the wood to stick out of the Plywood, if any.
Now that you have both pieces, the Plywood and the insert wood, we noticed the large surface area for the the glue. Because the pieces are concave and convex, so they fit together, the rounded area gives more surface area for glue.
Once you have the pieces glued together, now it is up to you what to do next. You can stain, paint, round the edges or do what ever you want to make the piece your own. This is a great system and gives the user full control over edge banding.
Final Thought
Overall this is a great system. It does take a couple of minutes to set up, but once everything is in place you are ready to rock and roll. As we noted, if you’re going to be creating a lot of edges, you might be better off using two routers. All and all this bit system is worth the price and the extra couple of minutes. This system eliminates the disadvantages of a traditional Veneer tape or glueing a piece of hardwood straight to the Plywood. If you’re looking to create a cabinet or any other woodworking project with Plywood, take a look at the Burgess router bit system.


This looks pretty cool. By the way you guys talk, it sounds like it would be a lot easier to have two routers if doing a lot of edging. Can not wait to try this.
This is very nice. I never knew you could do something like this. I am new to woodworking and would give this a shot. I see it takes some time to set up, but I am up to the task. I like the fact you can make the hardwood any size you want so you can round the corners or even have it flush with the plywood. Great review.
Only $139…. right….