
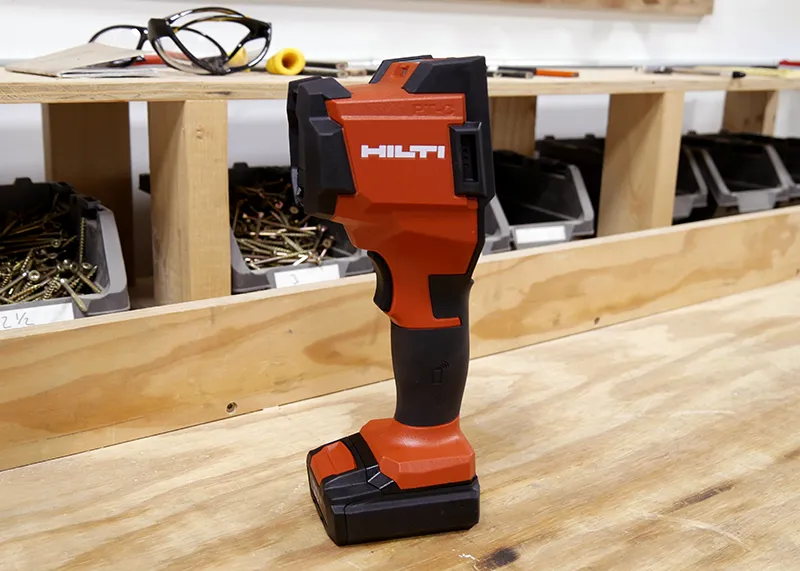
A few months back I shared with you all the incoming 2024 Hilti power tools and equipment. Today I have one of those tools in the shop to take a closer look at. It’s the Hilti PT-C Thermal Imaging Camera, and it just may be the best thermal imaging camera we have reviewed.
Today I’m walking you through all the specs and features Hilti promises, along with the pros and cons of the Hilti PT-C. Let’s dive in.
Hilti PT-C Review Guide
Hilti PT-C Thermal Imaging Camera
- Model Name: Hilti Thermal Camera
- Model #: PT-C
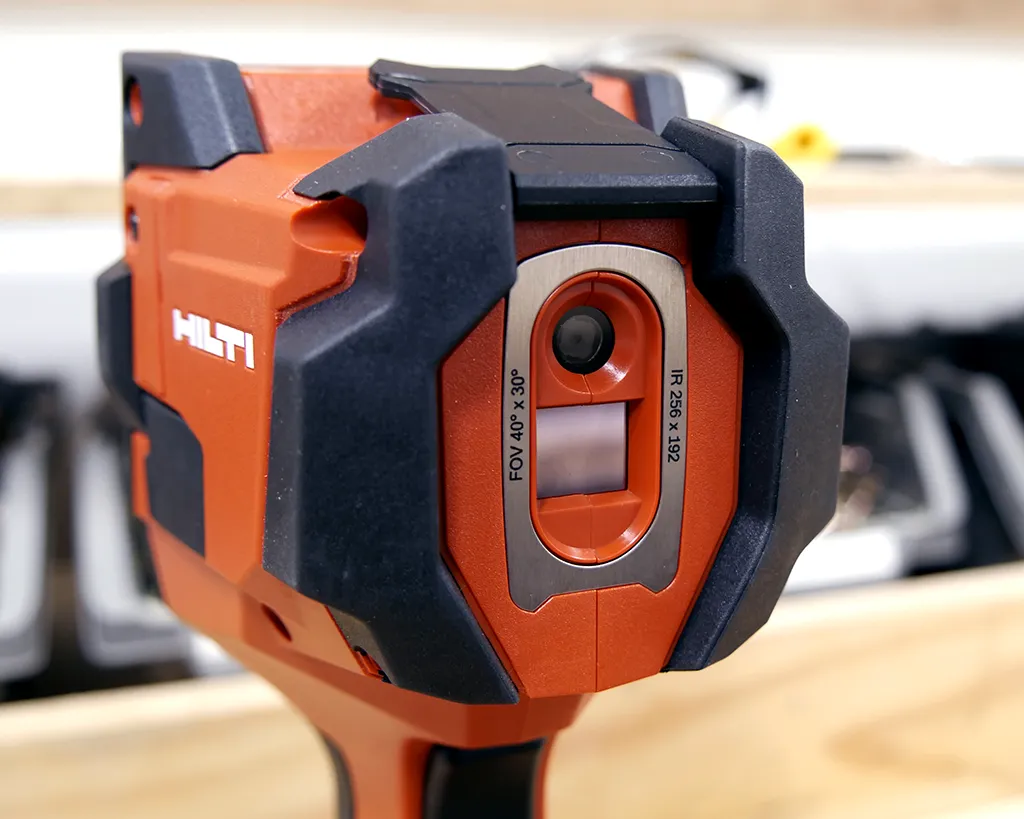
- Specs & Features: Equipped with a high-resolution infrared camera, picks up temperatures ranging between -20 °C (-4 °F) up to 600 °C (1,112 °F) from one to 16 ft. away, different modes for color, picture, measuring, and surface materials; has a lightweight and ergonomic design, simple finger point and shoot camera, drop resistant up to 1.5 m, has a 10-hour battery life, and easily transfers your images and voice notes via USB-C cable.
- Price: Kits range from $2,059-$9,269.
- Where to Buy: Hilti site.
How to Use the Hilti PT-C
Thermal imaging cameras tend to be easy to use, the Hilti PT-C is no different. However, Hilti is a global manufacturer, and everything from initial set-up and beyond could not be simpler.
Controls
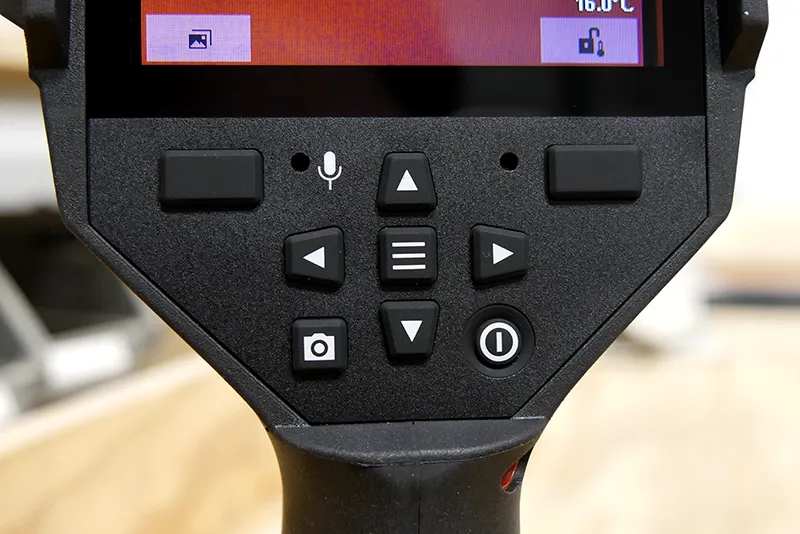
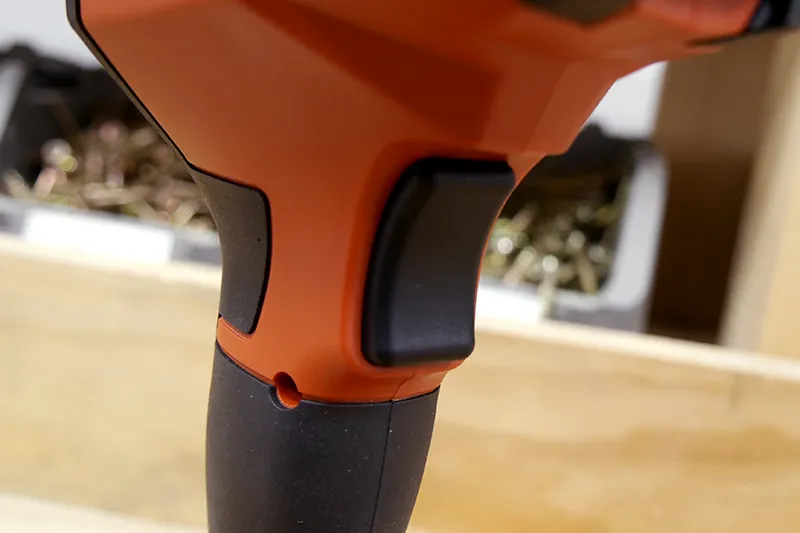
Hilti kept the controls simple on this thermal camera. The control panel includes:
- Four navigation (arrow) buttons.
- A center menu button.
- Lower left camera icon “save image” button.
- Lower right power button.
- Upper left gallery button.
- Upper right is an image lock/save to save additional copies of the same photo in different view settings.
On the control panel, you will also notice a microphone icon. It’s nothing you need to mess with. It just shows where the microphone is located.
The only other button is a trigger on the front side of the grip. This is how you take your photos.
Set-up
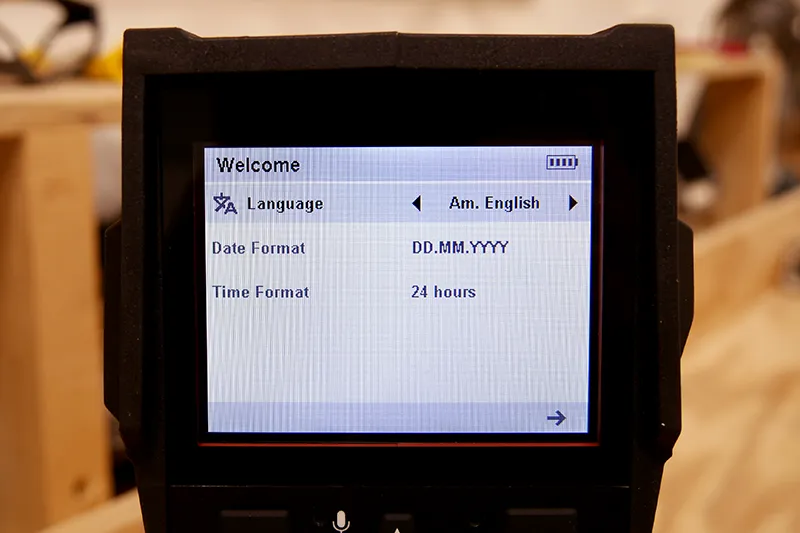
When you turn your Hilti PT-C Thermal Imaging Camera on for the first time you’ll be prompted through language selection, your preferred date display, and setting the date and time. It’s all very easy to set up with the navigation arrows and using the trigger to select your settings.
Once done it will prompt you to open the protective lens. It takes maybe a minute, and after that you’re thermal camera is ready to use and every time after.
Settings
This thermal camera has a variety of settings and Hilti does a better job of explaining them in its Hilti PT-C Instructions for Use video than I could. But I’ll summarize:
- The down arrow lets you select your “preferred picture mode”. This allows you to have a partial live view and infrared view.
- The center button allows you to select a measuring mode, or isolate scan to hot or cold areas.
- Selecting the upper right button from the menu screen allows you to select different surface materials for more accurate scans.
- From the gallery, you can select different views of your photo such as infrared, overlayed image, and optical image view. Pressing the upper right button will allow you to save these different views of your photo.
- “Voice Memo” can be selected from the menu screen.
Data Transfer
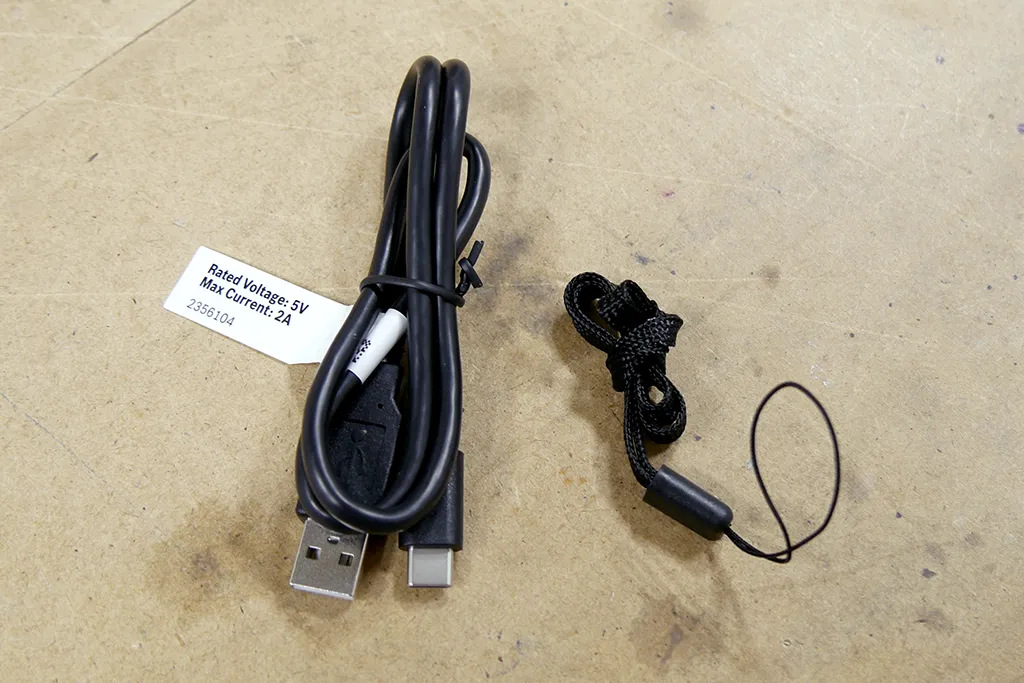
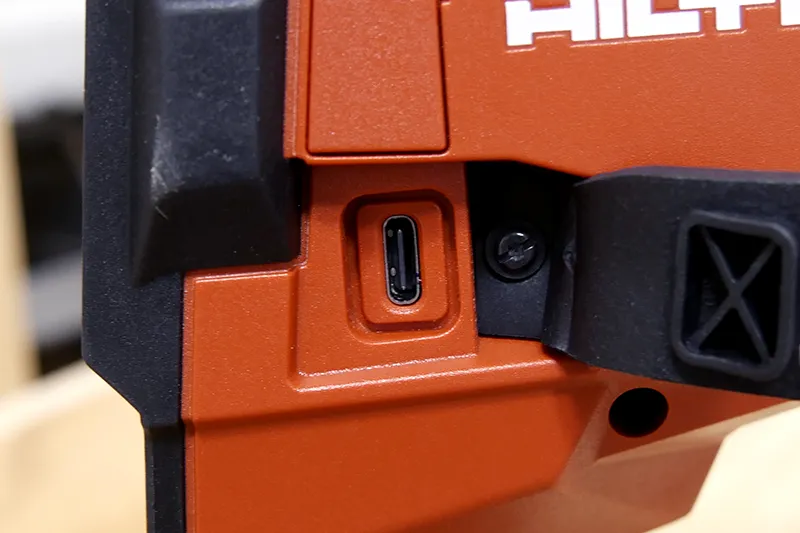
All of your photos and voice memos can be easily transferred with the included USB to USB-C cord. The USB-C inserts into a port underneath the silicon flap on the side to the right of the display screen.
Pros & Cons: Hilti Thermal Camera
Honestly, this thermal imager is practically a 10 out of 10. Each member of our team that played with it remarked how great the image quality was and how in-depth the features were.
But here’s a quick rundown of our pros and cons.
What we like:
- Easy, straightforward use.
- Image quality and large display.
- Surprisingly lightweight.
One of the things that I like most about the Hilti PT-C Thermal Imaging Camera is that this is a high-end end thermal camera, but it’s straightforward and easy to use.
When you turn on the Hilti PT-C it prompts you through a quick setup. Once setup is complete, it’s pretty much a point-and-shoot thermal camera. Going through the different features was easy and intuitive.
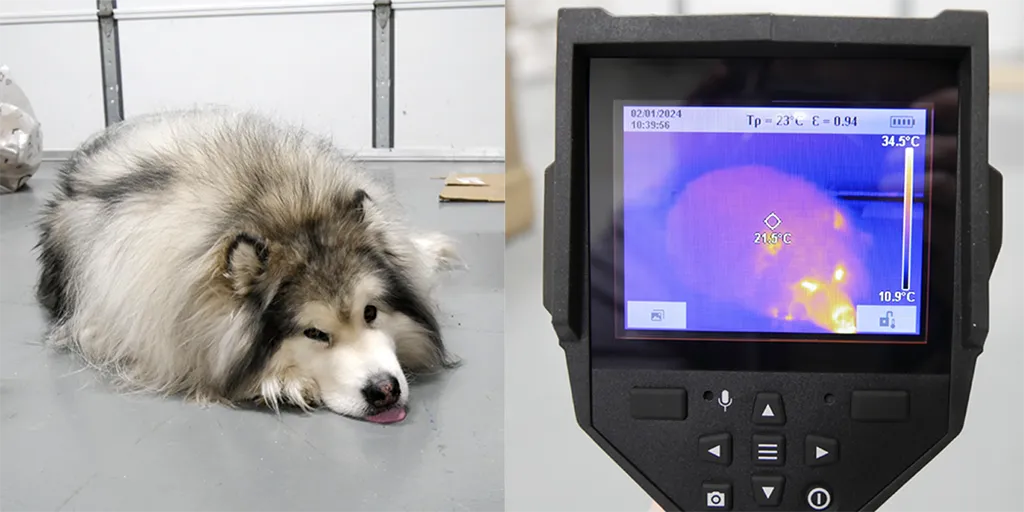
As soon as I used the thermal camera I immediately noticed the picture quality.
It wasn’t how the photos looked that impressed me. I was impressed by how fast the image adjusted to temperature changes, and there was barely any lag in the image quality compared to other thermal imaging cameras that I have worked with. I could actually move faster while scanning than with others, and still experienced barely any lag in the thermal camera. The display screen is also nice and big.
Now, this is a fairly big thermal imaging camera. Between that and the quality construction I was surprised by how lightweight this device is.
Looking at the Hilti PT-C you’d think it’d be really heavy. It’s kind of bulky in appearance. I thought if I dropped it while wearing the hand strap it would yank my wrist, especially if I was caught off-guard. However, the force is surprisingly a lot less.
What we don’t like:
- Manual & instructions.
There was very little we didn’t like about this thermal camera. In fact, my biggest complaint was the manual.
Most of the features were straightforward, but without instructions it was unclear how the voice memo feature worked. The manual didn’t really provide any help with this, and the manual was just very limited overall.
However, Hilti has a great Hilti PT-C How to Use video on the product page.
Value of Hilti PT-C Thermal Camera
The Hilti PT-C Thermal Imaging Camera is sold in three different kit options on the Hilti site. Those kits start at $2,059.
This is definitely an expensive thermal camera. But remember, Hilti builds high-end power tools and equipment for professional contractors. Many of these professionals are in industrial construction or work for large organizations. These jobs require the highest quality tools available and work to avoid as many setbacks as possible. Conducting their own thermal inspections saves money from hiring out, and saves the time spent waiting for inspections, which keeps these projects moving forward.
FLIR is Hilti’s biggest competitor for high-end thermal cameras.
FLIR thermal cameras are widely used in police and military field. Because of this I haven’t found a FLIR thermal imaging camera that directly competes with the Hilti PT-C. The FLIR C3-X does compare to the popular Klein TI290. These thermal cameras are much more affordable, both around $500. But the Hilti PT-C blows both of these cameras out of the water.
The FLIR E6 Pro is actually more expensive than the Hilti PT-C. It does have cloud storage, but it lacks the variety of scan features, and the voice memo option. The Hilti caters to the skilled trade pro in a way that FLIR doesn’t.
Now let’s take a closer look at Hilti’s kits for the PT-C.
Value of Kits 1 & 2
All of these Hilti PT-C Thermal Camera kits include:
- Hilti PT-C Thermal Imaging Camera
- Camera Hand Strap
- USB to USB-C Cord
- Hilti PT-C Tool Case
- Hilti PT-C Calibration Certificate
The first two kits are available for $2,059. However, kit two includes a battery and charger at no additional fee. Obviously, kit two is a better value.
Value of Kits 3
The third kit is five sets of kit two. Full price this kit would cost $10,295, but Hilti lists kit three for $9,269, knocking $1,026 off the original price.
Many skilled trade professionals do not need five thermal camera kits. However, this kit is great for supplying a large crew or multiple crews, or is a great option for a professional thermal inspection business.
Final Review of Hilti PT-C
Yes. I think this is the best thermal imaging camera available to skilled trade professionals. The near real-time view alone was something we hadn’t experienced before. Then add on all the different view and scan features and the Hilti PT-C sets itself above all other thermal imagers.
It’s an investment, but not one you’re going to regret.
