
Archived from the Tools In Action forum (Woodworking). This thread is read-only.
Last year I purchased the hand tool cabinet plans from fine wood working. It was the only one i saw that hit all of the things I wanted in a cabinet. So last November r I purchased some mahagony for a hand tool cabinet and it has been in my garage ever since.
I don’t have a lot of band saw experience and attempted to resaw the top and bottom last month that. It went terribly. The blade went off track in the wood and I had to cut the blade. It was a 1/2″ blade I believe. I purchased a 3/4″ Laguna blade (non resaw king) a while ago and just had no time to start it. I planned to get it started and use a friend’s large dovetail jig. He has no time for us to get together so I decided to start and hand cut these dovetails. This will only be my second time doing dovetails.
Today I spent about 30 minutes before shift to get the band saw tuned and aligned to the 3/4″ blade. I had time to cut one piece so I went for it. I resawed the shorter piece which will be the top and bottom. Amazingly it turned out perfect. I won’t have time until Sunday to do the last two pieces (two sides and doors).
For the door panels I will be resawing tiger wood. Should look really good with the mahagony. [External image (uploads.tapatalk-cdn.com), not copied][External image (uploads.tapatalk-cdn.com), not copied][External image (uploads.tapatalk-cdn.com), not copied][External image (uploads.tapatalk-cdn.com), not copied][External image (uploads.tapatalk-cdn.com), not copied][External image (uploads.tapatalk-cdn.com), not copied][External image (uploads.tapatalk-cdn.com), not copied][External image (uploads.tapatalk-cdn.com), not copied][External image (uploads.tapatalk-cdn.com), not copied]
Sent from my Pixel XL using Tapatalk
Made some progress this week and also hit a huge snag on the hand tool cabinet
First I ripped all the 8/4 mahogany down which went very smoothly. The boards did have some tension and cupped on me. I let them sit a few days and went to my wood store and had them joint the boards again. I planed them today. I jointed the edges and then started to rip some of the pieces down to find all dimension. The case will get hand cut dovetails. I got the case sides cut and as I moved my fence for the last adjustment for the sides, the hand snapped off. I contacted delta for a warranty replacement part. They approved it and will hopefully be here next week. Until then I can cut the sides to length and start those dovetails. Probably will take me all week anyways. Lol
So right now I have a whole lot of beautiful mahagony just sitting there. [External image (uploads.tapatalk-cdn.com), not copied][External image (uploads.tapatalk-cdn.com), not copied][External image (uploads.tapatalk-cdn.com), not copied][External image (uploads.tapatalk-cdn.com), not copied]
Sent from my Pixel XL using Tapatalk
IDK about you, but I’d drill it out and use a bolt and a pair of pliers until the new handle gets to you. I so rarely get time in my shop that I hate getting sidelined because something breaks or doesn’t fit.
Come to think of it, it’s probably not a good thing for my budget that Klingspors just moved their store less than 5 minutes from my house…
I was lucky and that piece came right out with a twist of my finger so no issue there. I’m going to run by ace and get a bolt for it in the mean time.khariV wrote:
IDK about you, but I’d drill it out and use a bolt and a pair of pliers until the new handle gets to you. I so rarely get time in my shop that I hate getting sidelined because something breaks or doesn’t fit.
Come to think of it, it’s probably not a good thing for my budget that Klingspors just moved their store less than 5 minutes from my house…
Sent from my Pixel XL using Tapatalk
Stopped by ace tonight and got a few different length bolts. Went home on lunch and tried them out. A little long but it will work until the replacement part arrives.
Sent from my Pixel XL using Tapatalk
Got a bolt in the fence handle today and started to cut the pieces for the cabinet. I must have miscalculated at some point and don’t have enough wood. I have to go into town tomorrow anyways and will pick up another board. This cabinet is getting expensive. On a good side note, I am loving how the mahogany is looking. [External image (uploads.tapatalk-cdn.com), not copied]
Sent from my Pixel XL using Tapatalk
Mahogany’s sheen is soo underappreciated. I need to pick some up.
I finally was able to get some more work done today. I got the reat of the pieces mapped out on my boards. I had just enough. Then I got the dovetails layed out and cut. I used a coping saw for the waste. I thinner blade would be nice. They turned out pretty well so far.
My chisels are in dier need of sharpening so I’m done for the night. Don’t like to hammer late anyways. Hopefully I will get them chiseled out tomorrow.
[External image (uploads.tapatalk-cdn.com), not copied][External image (uploads.tapatalk-cdn.com), not copied][External image (uploads.tapatalk-cdn.com), not copied][External image (uploads.tapatalk-cdn.com), not copied][External image (uploads.tapatalk-cdn.com), not copied]
Sent from my Pixel XL using Tapatalk
Got the tails cut out and started on the pins. I got one corner chiseled out. Not the best but certainly not the worst. I probably should have practiced. Not horrible for my second time cutting dovetails though. I think I will go back and re establish the line up just a little.[External image (uploads.tapatalk-cdn.com), not copied][External image (uploads.tapatalk-cdn.com), not copied][External image (uploads.tapatalk-cdn.com), not copied][External image (uploads.tapatalk-cdn.com), not copied][External image (uploads.tapatalk-cdn.com), not copied]
Sent from my Pixel XL using Tapatalk
Great work on the dovetails. Some day I’d like to aspire to hand cut some, but for now, I just picked up the RTJ400 and have been having fun doing them on my router table.
I’ve got a box! Sort of. All dovetails are cut. Some have more gaps than others. Practice would have actually been a good idea. I ordered a Katz Moses dovetail guide today to aid in future builds.
I did manage to get a crack somehow and not sure why or how. That one was one of the easier corners and it wasn’t there until after it was all together. Thinking of either putting wood glue in it and clamping it or putting it together and just putting epoxy in it.
Next is the cut through mortise and tennons for the shelf. I got as far as laying out the mortises on the sides. Tomorrow I will drill them out, chisel them clean, and then cut the shelf to fit. [External image (uploads.tapatalk-cdn.com), not copied][External image (uploads.tapatalk-cdn.com), not copied][External image (uploads.tapatalk-cdn.com), not copied][External image (uploads.tapatalk-cdn.com), not copied][External image (uploads.tapatalk-cdn.com), not copied]
Sent from my Pixel XL using Tapatalk
Shelf through morstises are done. Overall I’m happy with them. The other side has a gap that I need to fill. I first used a Forster bit to hog out most of the mortise and then chiseled the rest out. Next up before glue up is to mortise for the hinges. If I were smart I would have ordered them weeks ago. But I’m not and ordered them last night. Hopefully they will arrive soon.
Sent from my Pixel XL using Tapatalk
[External image (uploads.tapatalk-cdn.com), not copied][External image (uploads.tapatalk-cdn.com), not copied]
Today I I cleaned up the shelf a little bit and got rid of the frays on the ends. If I would have done my cuts in a different order it would have been much cleaner. Oh well, it won’t be seen.
I used my router table to rabbet the back sides of the carcass to accept the back panel. I then got the back pieces cut. The bottom will be the French cleat that holds the whole cabinet up. The seem is hidden by the shelf. I used my new Makita cordless track saw today and holy crap! I love this saw. The cuts on 1/2″ plywood were so clean and crisp. I also used the track saw to cut the 40 angle for the cleat. Making progress!
My hinges will be here tomorrow. I will cut and mortise those in. After I do that I will glue the cabinet carcass together.
My dove tail guide will also be here today. I will use that on the doors this weekend too.
Lots of pics. I wanted to show how clean the stock Makita blade is on plywood. I’m very impressed. [External image (uploads.tapatalk-cdn.com), not copied][External image (uploads.tapatalk-cdn.com), not copied][External image (uploads.tapatalk-cdn.com), not copied][External image (uploads.tapatalk-cdn.com), not copied][External image (uploads.tapatalk-cdn.com), not copied][External image (uploads.tapatalk-cdn.com), not copied][External image (uploads.tapatalk-cdn.com), not copied][External image (uploads.tapatalk-cdn.com), not copied]
Sent from my Pixel XL using Tapatalk
Got the carcass glued up today. It went pretty smoothly. It’s square but I need to plane the joints flush. I prefinished the inside pieces with one coat of shellac to help with glue squeeze out.
Yesterday I routed out the spot for the hinges. I finished the fit with some chisel work. All fit nice and flush.
Before work today I routed out the hinges on the door sections and I started the dovetails with my new Katz Moses dovetail jig. Very happy with it so far. Only complaint is it is very slick and moves slightly. [External image (uploads.tapatalk-cdn.com), not copied][External image (uploads.tapatalk-cdn.com), not copied][External image (uploads.tapatalk-cdn.com), not copied][External image (uploads.tapatalk-cdn.com), not copied]
Sent from my Pixel XL using Tapatalk
Chop chop. No time for the pins before work today. At least the tails are done. [External image (uploads.tapatalk-cdn.com), not copied]
Sent from my Pixel XL using Tapatalk
Doors are all dovetailed! Ready for glue next. I finished chiseling out the mortises for the hinges today as well. Feeling accomplished! [External image (uploads.tapatalk-cdn.com), not copied][External image (uploads.tapatalk-cdn.com), not copied][External image (uploads.tapatalk-cdn.com), not copied]
[External image (uploads.tapatalk-cdn.com), not copied][External image (uploads.tapatalk-cdn.com), not copied]
Last night I filled the dovetails with glue and sanded them flush. This filled any gaps left by my terrible hand cut dovetails [emoji16].
Today I got the plane til cut out. Support triangles on each side support the plywood the planes will reat on.
I also cut the first piece of tigerwood for the door panels. Trying to figure out the best book match and thickness for veneer work. I somehow don’t have pictures of that. I’ll get some soon. [External image (uploads.tapatalk-cdn.com), not copied][External image (uploads.tapatalk-cdn.com), not copied]
Sent from my Pixel XL using Tapatalk
Cut the veneers today for the front door panels. Resawed tigerwood for some bookmatched veneer. More curl in it and the camera can pick up. Should look really good with finish. The drawer fronts will also be tigerwood and the curl is much more prevalent on the off cuts from these peices.[External image (uploads.tapatalk-cdn.com), not copied][External image (uploads.tapatalk-cdn.com), not copied][External image (uploads.tapatalk-cdn.com), not copied][External image (uploads.tapatalk-cdn.com), not copied]
Sent from my Pixel XL using Tapatalk
Just call me clamp champ! First piece of veneer is in glue up. I should have probably done a pair at a time but oh well. Not like I have been rushing this build by any means. I would like to finish here soon though.
Took out the back piece and sanded it. Will put on a few coats of shellac possibly after work tonight. While the veneers are in glue up I’ll sand the door cases and fill in the voids like I did the carcass. [External image (uploads.tapatalk-cdn.com), not copied]
Sent from my Pixel XL using Tapatalk
rrich1 wrote:
On 4/25/2018 at 1:23 PM, rrich1 said:I’ve got a box! Sort of. All dovetails are cut. Some have more gaps than others. Practice would have actually been a good idea. I ordered a Katz Moses dovetail guide today to aid in future builds.
I did manage to get a crack somehow and not sure why or how. That one was one of the easier corners and it wasn’t there until after it was all together. Thinking of either putting wood glue in it and clamping it or putting it together and just putting epoxy in it.
Next is the cut through mortise and tennons for the shelf. I got as far as laying out the mortises on the sides. Tomorrow I will drill them out, chisel them clean, and then cut the shelf to fit. [External image (uploads.tapatalk-cdn.com), not copied][External image (uploads.tapatalk-cdn.com), not copied][External image (uploads.tapatalk-cdn.com), not copied][External image (uploads.tapatalk-cdn.com), not copied][External image (uploads.tapatalk-cdn.com), not copied]
Sent from my Pixel XL using Tapatalk
I haven’t tried it yet, but I read somewhere about using a vacuum to try and suck the glue through a crack before clamping. It seems like a good idea rather than just trying to push glue into a crack.
I had someone mention that on another forum. I just out a little glue in it and I think it will be fine.SetBuilder wrote:
I haven’t tried it yet, but I read somewhere about using a vacuum to try and suck the glue through a crack before clamping. It seems like a good idea rather than just trying to push glue into a crack.
Got the first piece out of clamps today. I think it turned out pretty well. Second one is in clamps. Really don’t want to wait a full 24 hrs for these last three but I think I will wait. I want the glue to dry thoroughly.
I sanded the plane til and got a seal coat on that as well. [External image (uploads.tapatalk-cdn.com), not copied]
Sent from my Pixel XL using Tapatalk
Been a while since my last post. I managed to get the doors made and dry fit today. During the dry fit, I snapped off a section of the middle rail of one of the doors. I managed to get it glued back together. Blends in very well with the grain and no one would ever notice.
I routed in two holes for hold fasts in the left of my work bench and have used them a decent amount since then. I was able to clamp in the doors pieces for sanding and planing. I just need to bite the bullet and do it to the top of the bench. [External image (uploads.tapatalk-cdn.com), not copied][External image (uploads.tapatalk-cdn.com), not copied][External image (uploads.tapatalk-cdn.com), not copied][External image (uploads.tapatalk-cdn.com), not copied]
Sent from my Pixel XL using Tapatalk
Second door panel is glued and drying. I was hoping the sunlight would give me some better pics but I was wrong. I really like how these came out. Somehow I did make an error and not sure how but the panels on the right in the first pic were glued upside down. It wasn’t my ideal layout but it works just fine.
Second error was prefinishing them. I wanted to make glue clean up easier and finishing some what easier. I forgot that the stiles and rails are not completely flush so I will need to plane/sand them down a little bit. I’m using shellac so I don’t think it will be much of an issue getting everything to look good again. [External image (uploads.tapatalk-cdn.com), not copied]
Sent from my Pixel XL using Tapatalk
Well this is a thing that happened today. I got the back finally put on making the case as square as can be. I just used screws, no glue or Brad nails but I think it will be fine. Two of my hinges were lost by the mail so I have the last pair arriving tomorrow. I still have to finish the door fronts and sides with shellac. I attached the plane til and am about to start the interior doors. Pretty happy with it so far. [External image (uploads.tapatalk-cdn.com), not copied][External image (uploads.tapatalk-cdn.com), not copied][External image (uploads.tapatalk-cdn.com), not copied]
Sent from my Pixel XL using Tapatalk
Its looking really good! That will end up being a nice piece to pass down in the future.
Thanks. It’s not perfect by any means but it should suffice just fine.mtnkid85 wrote:
Its looking really good! That will end up being a nice piece to pass down in the future.
Sent from my Pixel XL using Tapatalk
Before work I was able to get the shelf and the hinge part of the doors made above the plane til. I mortised out for the hinges but they are not closing fully. The hinges sit flush with the wood so not really sure what I should do. I think chamfering the edge might help reduce the bulk and fix the issue.
The shelf is dadoed into cleats screwed to the sides. The hinge part of the door is then screwed into that. I will replace the screws with brass screws to match the hinges.
Up next is to make the playwood doors and attach them to the hinge section. [External image (uploads.tapatalk-cdn.com), not copied]
Sent from my Pixel XL using Tapatalk
The mortises for the hinge plates might be a wee too deep. Without modifying the wood any, you could try mounting the hinges with a super thin shim underneath so that they sit maybe 1/64″ proud of the surface. That might solve the problem of the wooden door pieces hitting the sides when the hinges are closed. If that solves the problem, planing the edges of the door and/or the sides to a slight angle could have the same effect.
I had planned to plane the side down a little. I confirmed with Alabama woodworker on Instagram and he had the same issue when he made his.khariV wrote:
The mortises for the hinge plates might be a wee too deep. Without modifying the wood any, you could try mounting the hinges with a super thin shim underneath so that they sit maybe 1/64″ proud of the surface. That might solve the problem of the wooden door pieces hitting the sides when the hinges are closed. If that solves the problem, planing the edges of the door and/or the sides to a slight angle could have the same effect.
Sent from my Pixel XL using Tapatalk
I got the doors made and fitted. The left door was a pain and still wants to pop open where the right side doesn’t. In the pic I had them slightly open. These will be held down with magnets so I think they will be ok.
Up next I am going to do the plane til dividers. This will at least get my planes off of the work bench and into the cabinet. [External image (uploads.tapatalk-cdn.com), not copied][External image (uploads.tapatalk-cdn.com), not copied]
Sent from my Pixel XL using Tapatalk
Finally got the upper doors done. A few coats of shellac and buffed with paste was. I replaced the hardware on the sides with brass domed screws. Flat head unfortunately. But it ties it all together. I used two magnext super glued in with screws to keep the doors from opening. They aren’t rare earth magnets so hopefully they will be strong enough. [External image (uploads.tapatalk-cdn.com), not copied][External image (uploads.tapatalk-cdn.com), not copied][External image (uploads.tapatalk-cdn.com), not copied]
Sent from my Pixel XL using Tapatalk
Looks fantastic! Thanks for bringing us along for the ride.
Beautiful work brother! Cannot wait to see it hanging and tooled up!
Thanks guys.
@chrisk it’s already hanging up [emoji6]. I borrowed some planes today from a friend to map out some future future purchases. Have a full day of stuff today so not sure if I will get to it today or not.
Want to get the other doors made up soon. That will only leave me the bottom “gallery” area under the plane til. The plan calls for two drawers on the left and plane storage for the rest of the stuff. I’m going to change that and do another set of drawers on the right side. The middle might have a shelf in it or be left completely open. Still undecided. For reference here is a pic from the plans. [External image (uploads.tapatalk-cdn.com), not copied]
Sent from my Pixel XL using Tapatalk
That’s a lot nicer than anything in my workspace! It’s too nice, it would look out of place!
Well this is annoying [emoji849]. Measure twice cut once. I resawed some mahagony to get the stock for the plane til dividers. I marked out my screw hole lines on the first one and found out I needed a few more long ones. I transferred the screw lines but not the length line. Ugh.
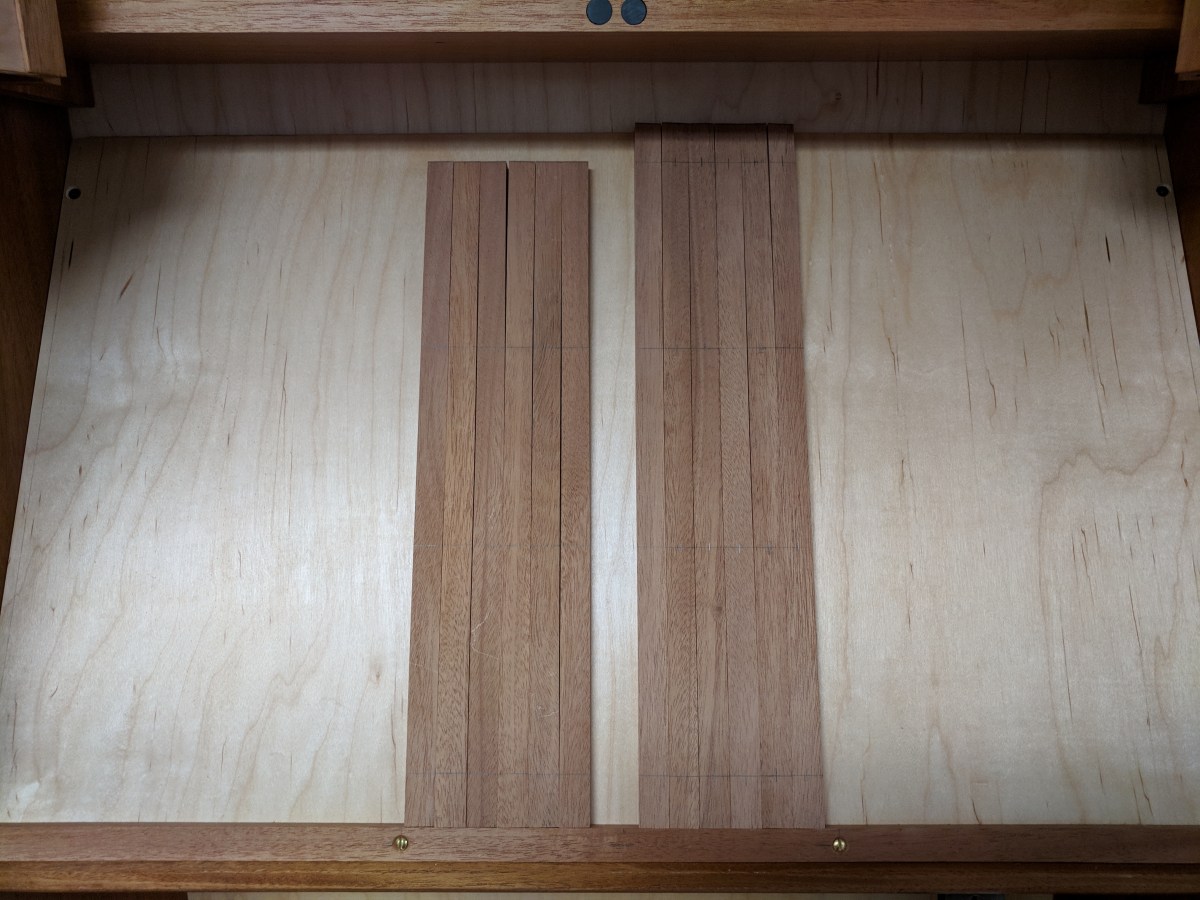
A lot of progress between last night and this morning so far. I got the plane til all but finished. I didn’t order enough of the screws I was using so I will have to get more.
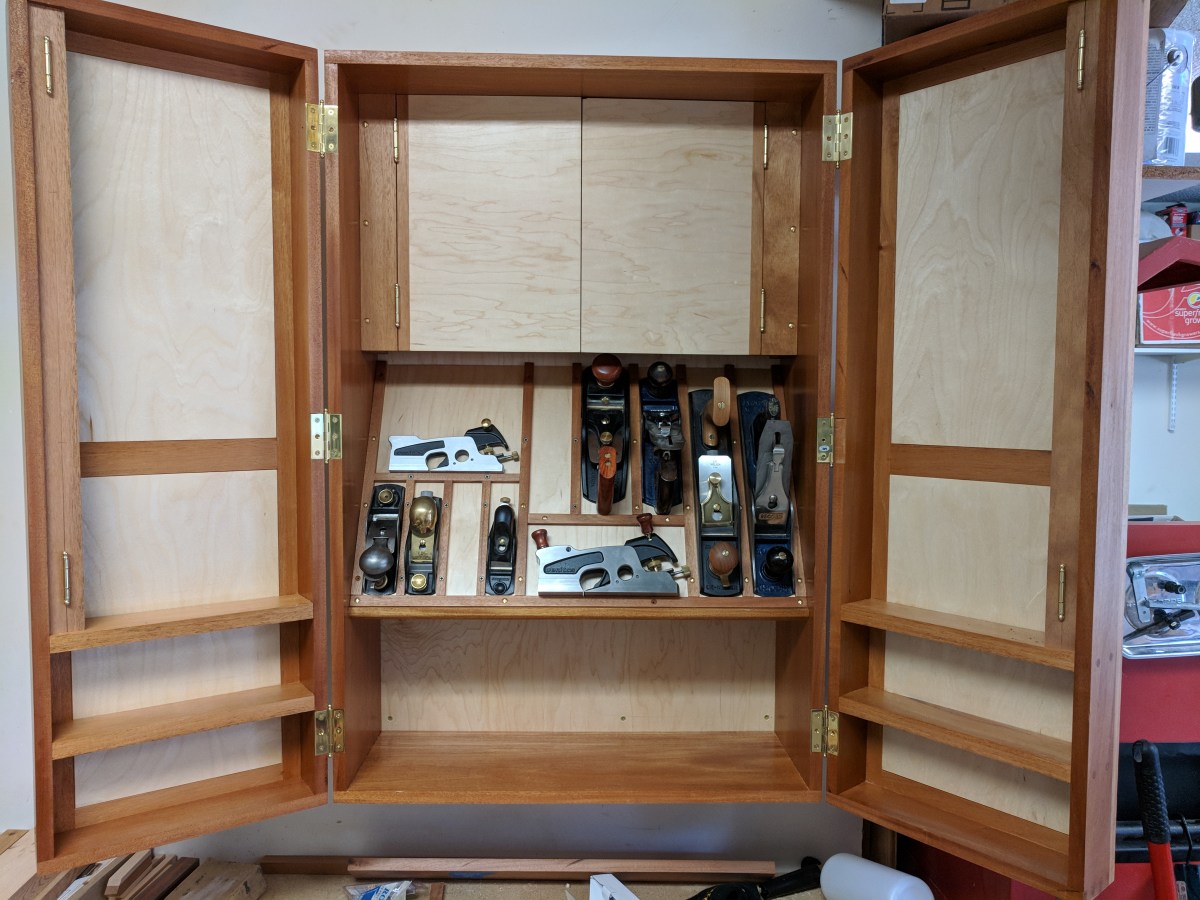
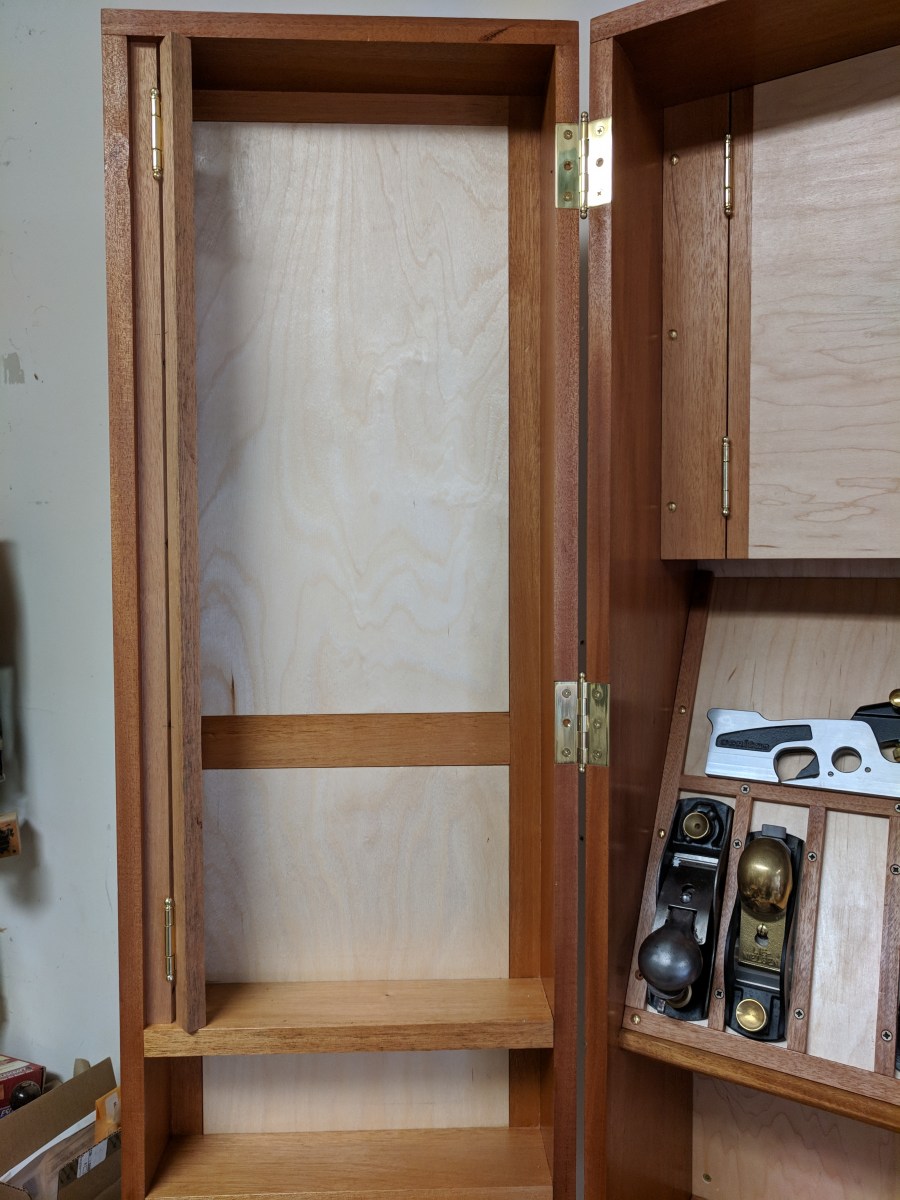
This morning I started to work on the interior door doors. I got the cleats cut to fit and mortised the hinges. I had planned to go to the gym but forgot they closed at noon so i will work on cutting the plywood for the door and putting a dad in the cleat to accept the door.

I seriously hope to even get half as good as you at woodworking.
BMack37 wrote:
52 minutes ago, BMack37 said:I seriously hope to even get half as good as you at woodworking.
Haha. I’ll take a pic of the door that I need to plane down because it doesn’t sit flush. 🤣
Finished one of the doors today. I had to fix an issue with the other door so I didn’t glue it up until today. Having hinges with the rod that is removable is super handy when you are finessing the size of a door.
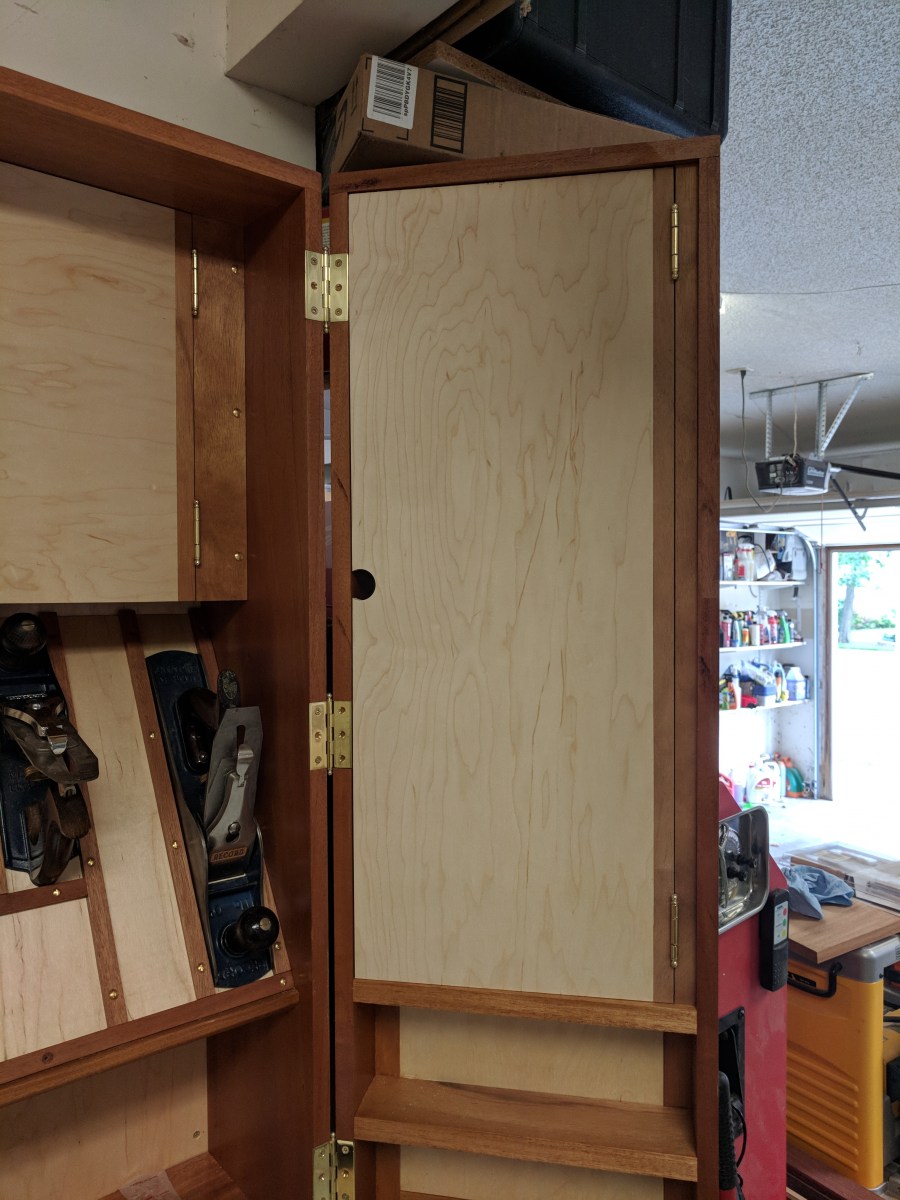
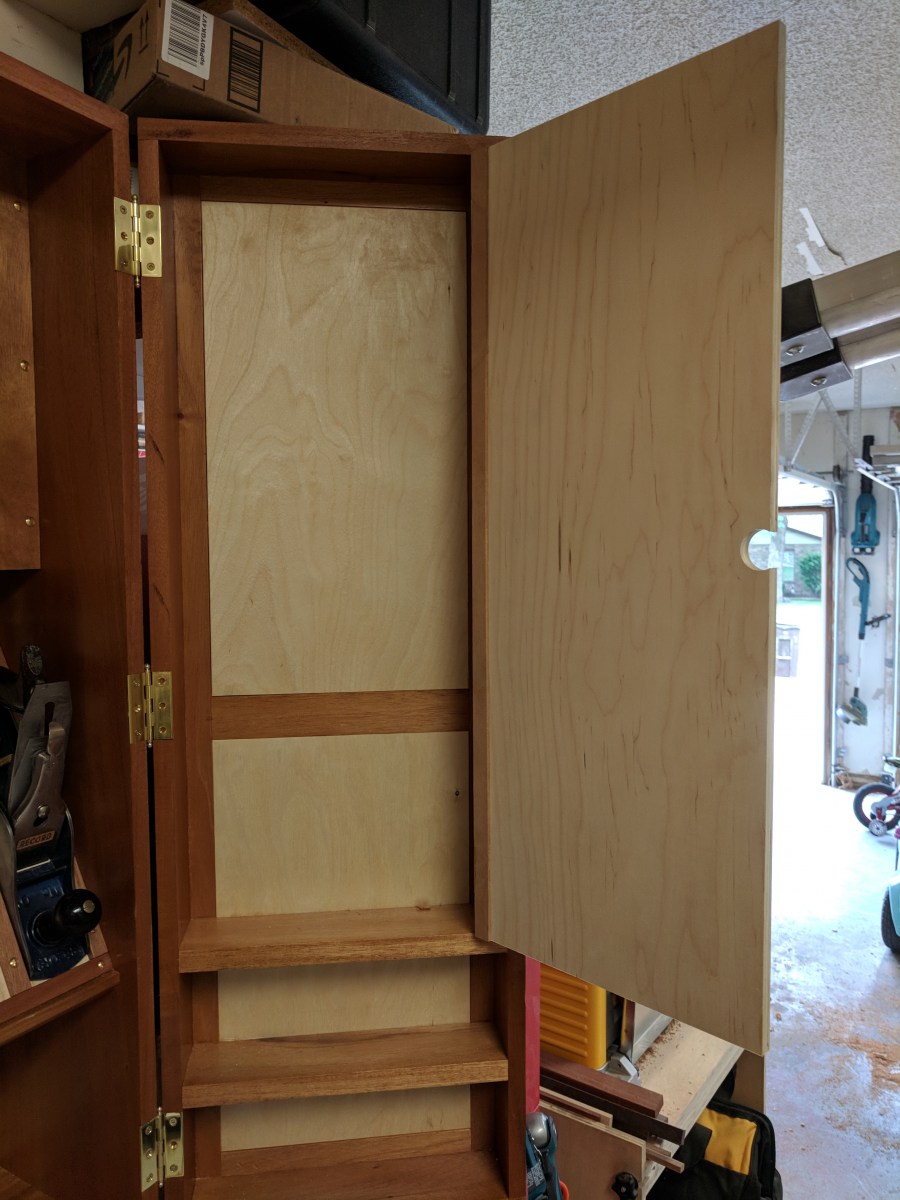
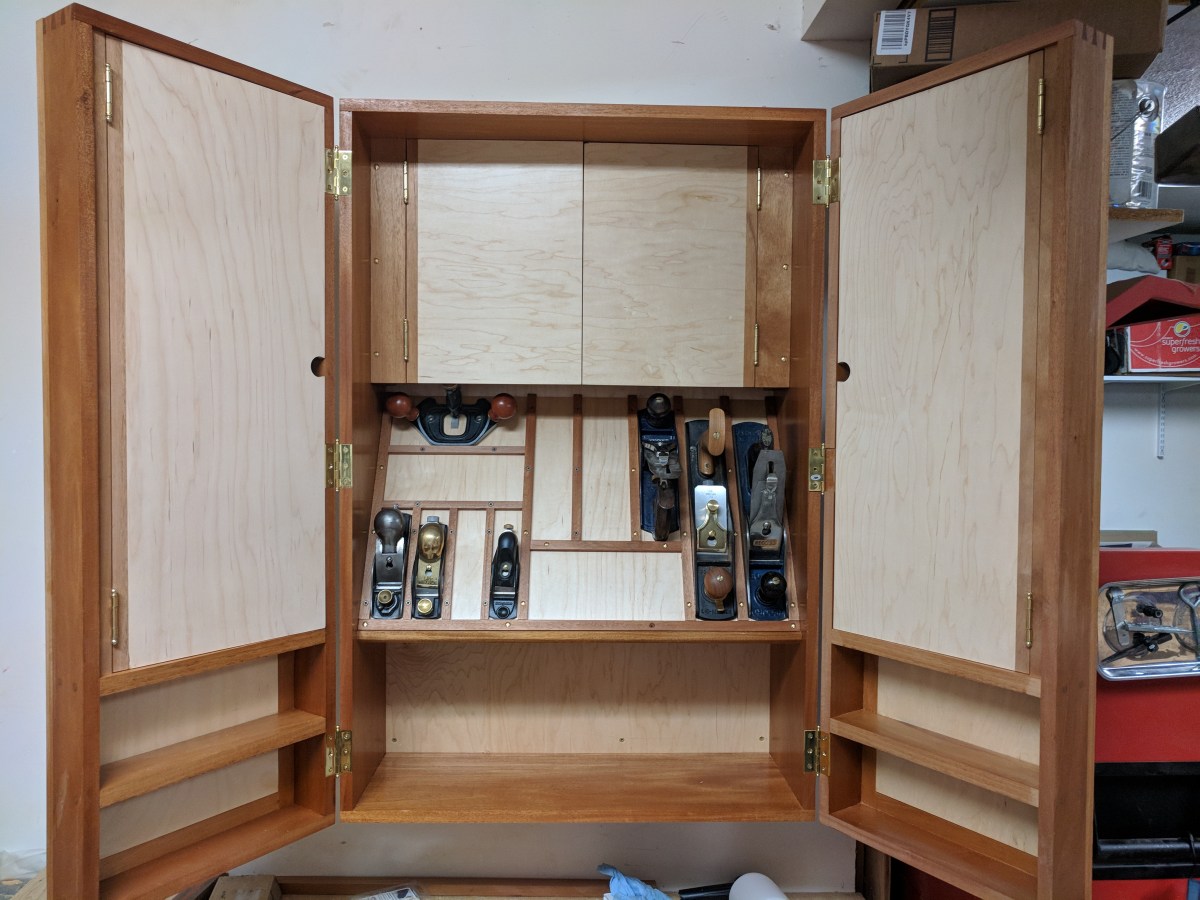
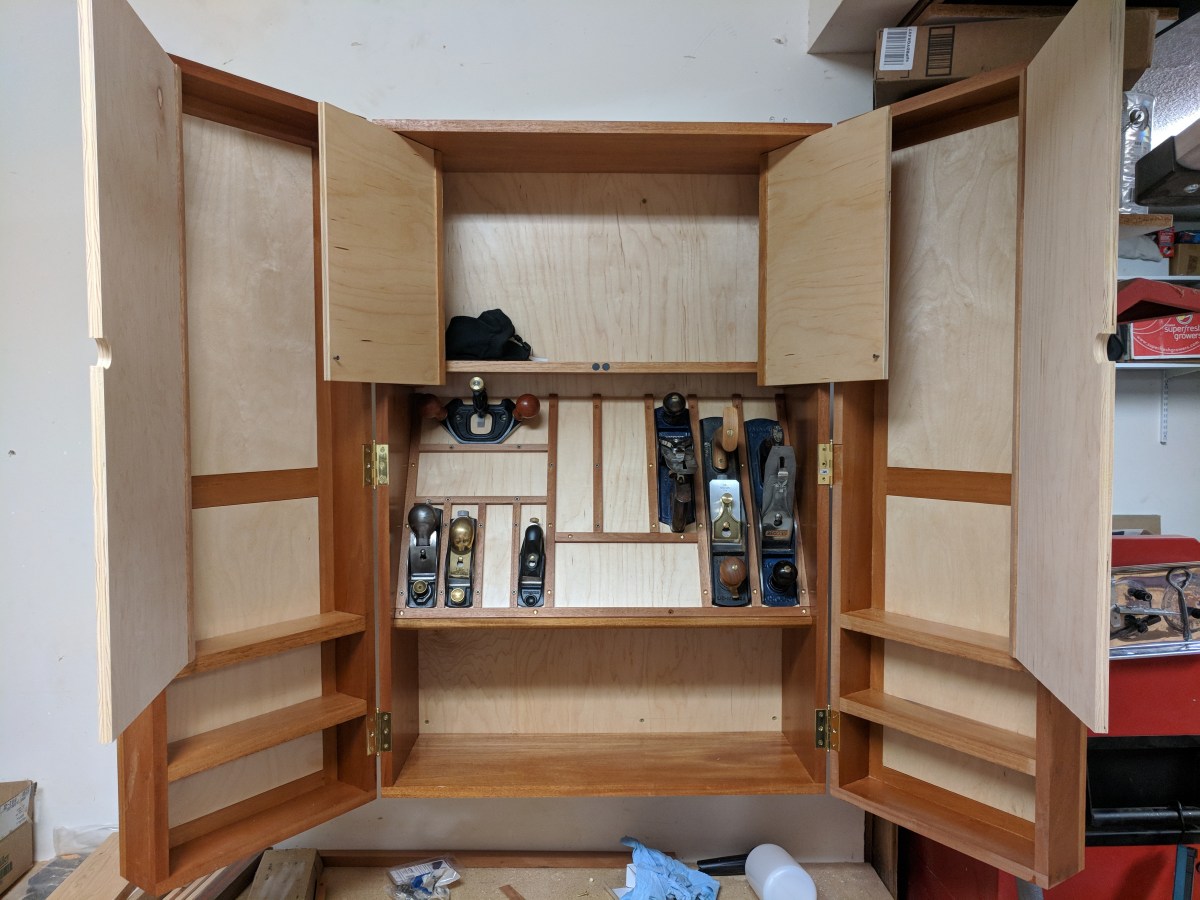
Current state of the cabinet. After work tonight I got the second door fitted. I also planed down some of the right door. It got a twist in it and I should have done it before gluing the panel on but oh well. I checked my stock of mahogany that I have left and I don’t have enough length wise pieces to make the top of the gallery under the plane til. I am headed to town in the morning to get some stronger magnets so I’ll stop by and get a piece of wood as well from my lumber store. I might actually get this finished by the end of next week.
I’ll still need to make tool holders but I am in no rush to do that. Those can be done with free time. I need to get started on the dresser and night stand guild build after this.
rrich1 wrote:
On 5/28/2018 at 10:34 PM, rrich1 said:Haha. I’ll take a pic of the door that I need to plane down because it doesn’t sit flush. 🤣
haha, TBH that’s why I liked the mistake pic…everyone on here and IG never make mistakes, I feel like I’m constantly correcting mistakes.
I had another accident when I was making the first door. I was able to cut some of it out by redoing the rabbet (cut the board wide on purpose to cut to fit.)
Yesterday I bought a piece of mahogany for the gallery area. I got it rough cut to size and planed mostly down. I made it in the shape of a u so I can make drawers for each side. The mahoyis going to be the top of the gallery. The middle will be modular storage.
Sent from my Pixel XL using Tapatalk
A whole lot of progress the last 24 hrs.
First I cut out a section of the top doors to allow more room for the planes in the til. Now I am able to turn them handle up and not come in contact with the door. I drilled a 5/8″ hole and used the band saw to cut the pieces out. Worked really well.
Second I made door stops with magnets in the interior doors. The left door is being stubborn though and won’t stay “latched”. I’ll mess with it some more.
Third I got 80% of the gallery done. I made a mistake today I told myself yestery to not do. The drawer area on the left and right has a shelf. That shelf I cut too short. To fix it I was going to make the dad and rabbet shallower. Well…I didn’t. I will most likely put some strips in there to fill the gaps.
Hopefully I can get the gallery out. It is super tight in there right now. Once I get the gallery to my liking I’ll glue it up and the it is the dovetailed drawers. Getting closer to the finish line. [External image (uploads.tapatalk-cdn.com), not copied][External image (uploads.tapatalk-cdn.com), not copied][External image (uploads.tapatalk-cdn.com), not copied]
Sent from my Pixel XL using Tapatalk
Yesterday I glued up the plane til and today I got it sanded and planed down. It fits and I’m happy.
Most of my time today was taken up by replacing the water pump on my wife’s escape. Three trips to town and it’s done. While I waited to do certain things to the car I was able to get stuff done to the cabinet.
Today I got the accessory holders made for all of my measurement tools. It took a while but I made a layout that I liked. To help secure the pieces in the holders, I drilled a hole in the back and placed a small magnet in the hole. No enough to make it difficult to get the pieces out but strong enough that they dont fall out when opening the door.
Last night I did make the spokeshave shoulder. No super happy with it but it will do the job just fine and it’s on top out of my line of sight.
I also started on holder for my marking guage and dividers. I made an extra slot for another guage.
I started to make a chisel rack layout but didn’t start that one yet. I have the DeWalt chisels but want the lie Nielsen chisels really badly. I don’t want to drill holes too big and have to redo them. I think@chrisk has some? If so can you get me the wides measurement by the socket/handle? I know the sizes get bigger on the woder chisels.
[External image (uploads.tapatalk-cdn.com), not copied][External image (uploads.tapatalk-cdn.com), not copied]
Sent from my Pixel XL using Tapatalk
Got a few more tools laid out and up. The upper right cabinet is holding all of my layout tools. Dividers, marking knives, and marking guage.
The right door will hold my saws. I am wanting a to get a Japanese pull saw and a few more veritas saws. Obviously they won’t all fit on the door. Will have to add some inside.
My chisel rack is laid out but not drilled yet. I have to make racks for my Witte screwdrivers as well.
The gallery itself is all done. It’s been shellaced and a coat of wax on and buffed out. Drawers are the only thing left besides the tool holders! [External image (uploads.tapatalk-cdn.com), not copied][External image (uploads.tapatalk-cdn.com), not copied]
Sent from my Pixel XL using Tapatalk
Planed down the material for the drawers today. It got a little thinner than. I wanted but I should be fine. Bookmatched tigerwood. The wood will be continuous for the drawers. Should look really good with all of the curl. The section on the right with little curl won’t be needed.
Sent from my Pixel XL using Tapatalk
[External image (uploads.tapatalk-cdn.com), not copied]
Continuous grain pattern and curl ftw. I think I need to order a smaller chisel. The smallest I have is 1/4″ [External image (uploads.tapatalk-cdn.com), not copied]
Sent from my Pixel XL using Tapatalk
I need to get a smaller chisel so the dovetails are on hold at the moment.
I finished the chisel rack and made a screwdriver rack as well. [External image (uploads.tapatalk-cdn.com), not copied][External image (uploads.tapatalk-cdn.com), not copied]
Sent from my Pixel XL using Tapatalk
Been a while but there has been some work done.
At this point in time all I have left to do is the drawers. I finished putting finish on the entire cabinet and all of the tool holders. The front of the main doors stiles and rails as well as the sides hadn’t been coated yet.
I made a few saw holders and really happy with how they turned out. I oversized some pieces of mahogany and tigerwood for the saw blades. This allowed the whole blade to be covered and not slice me in passing. The magnets hold the saws to the door and keep them from shifting when opening and closing. I have used magnets a lot in the tool holders and will also put some at the door corners to keep them closed. [External image (uploads.tapatalk-cdn.com), not copied][External image (uploads.tapatalk-cdn.com), not copied][External image (uploads.tapatalk-cdn.com), not copied][External image (uploads.tapatalk-cdn.com), not copied][External image (uploads.tapatalk-cdn.com), not copied][External image (uploads.tapatalk-cdn.com), not copied][External image (uploads.tapatalk-cdn.com), not copied]
Sent from my Pixel XL using Tapatalk