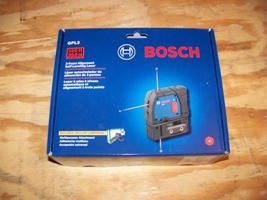
Laser levels are always cool and fun to review, but the reviews are even better when they are Bosch. We took the Bosch 3-point Alignment Self-Leveling Laser for a test drive and found it to be pretty cool and unusual. So lets get into the review.
Tool Review: Bosch Laser Level Review
Model Number: GPL3

| Pros: | Accurate, Range, Outer Construction |
| Cons: | ON/Off Switch didn’t always stay in position |
| Specifications of the Bosch Laser | |
|
|
 |
 |
| The Nuts & Bolts |
If you have seen our other reviews, you know we lean heavy towards Bosch power tools. These tools are designed for the professional. They are built to last and why some of their prices are a little higher than some of the brand names, what you get is well worth the small extra cost.
Now you can see the specifications above, but lets take a look at some of the features on the laser and learn a little more about this before we jump into the laser review. In today’s market there are a lot of different types of laser available to fit your need. The Bosch GPL3 is a 3 point Alignment Self leveling laser. This laser is a Plumb and Level point projection, which is great for a lot of applications such as doors, lighting and more. This level uses a single diode, which Bosch has a patented Diamond cut beam splitter for greater accuracy compared to other laser brands. As noted above this is a self level system up to 5 degrees and will indicate if the laser is out of level.
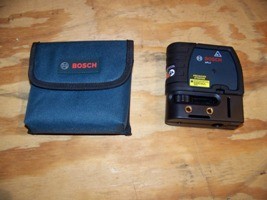
Besides having quality parts in this laser to make it very accurate, Bosch included a couple items that you can notice by looking at the laser. First is the Molded Housing to help protect this tool when dropped. Now we don’t suggest dropping this tool, but we ended up knocking it off the back of Eric’s truck bed right on the concrete flooring. We actually thought this might have ruined the laser since the laser was on and not locked. To our surprise, it still worked without any problems. However, we did have to recalibrate the laser which was a snap. The other item you can notice is the case or the pouch. The pouch is designed to wear on your belt. There is a large piece of Velcro which holds the flap down and the laser in the case. There is more than enough room to get the laser in and out without it being too tight of a fit and causing frustration.
The Review
For our review we took a look at a couple of things. One was just mentioned above where a person who uses this on a daily basis needs to be able to access the laser numerous times throughout the day and not have to use two hands in order to get the laser in and out of their side case. We won’t go back into this, but we wanted to mention it again as the design of the case is very nice and allows the user to access this tool very easily.
The next item was its usability. As with most lasers of this type, they are very easy to use. We did want to see how bright the laser was since you can be assured of an accurate site up to 100′. Now one thing you have to remember with all lasers is they are sometimes sensitive and will not always get a good reading depending upon the temperature and temperature differences, so always be aware of your surroundings. We set the laser on a tripod and took it outside. We lined up about 75′ away to make a point on the outside wall. Now that was hard to pick up as the beam was not very bright. However we were outside in the sun, inside was very easy to see. We actually just chalked this up to being old as we are all over 35yrs old. So maybe it was just our blindness. When we walked over the the wall we could see the point. So one thing to consider if you are working by yourself, some set ups might require a little more time and a little more patience.
The third item was accuracy. We took the Bosch laser and did some measurements and compared them to another laser that cost about $1300. We will not go into the other name as the other laser is completely different and shouldn’t be compared to each other, but if the Bosch laser could be just as accurate to a laser that is 7 times the price, then we know it is a great laser for the money. We also ran it against a simple plumb line. We had an old concrete wall that was bowed out. We set up the Bosch laser and took a measurement below the bow and above the bow. We set up the other laser and took the same measurements at the exact same spots and both lasers were dead on in regards to the distance from the wall. The total run of the beam was 63′ with the first measurement taken at 23′ and the second measurement taken at 46′. For the plumb line we didn’t have a line long enough, so we took the center of the bow, where the laser beam hit on the first two measurements and let the line down. Again we had a dead on hit with the plumb line right on top of the laser head.
Bosch makes some of the best power tools around. There tools are designed for the professional and this laser is no different. The 3-point system is great and the accuracy is dead on. For the price of this laser and what you get compared to lasers that are a lot more expensive, this hangs in there with the top dogs and more expensive lasers. This is a great buy for the price whether or not you use a laser in your everyday job or once in a while. We know you will not be disappointed with this buy.


Great review
Strong laser. Dropped this baby a couple of times. I did have to recalibrate it, but works like a charm.
How do u recalibrate it ?
did it once, with the gll3
pain in the $@## to calibrate
you will need to adapt it to this one and try to find a methode similar that would work.
the wak to do it is to find something that you know is where the laser should be.
for a pointer like this you might need a manual plumb and make a mark on a floor and ceiling
and adapt the following to your specific laser.
i dont have this model so i’m only making supposition 🙂
you need to take it apart and you will see few screw near the self leveling unit and you need to try it yo see what does what.
you go in a place where you can see very far. , you turn it on, make some mark on the further wall at the laser. rotate it by 180 degree and see if the laser align with the mark.
if not you need to calibrate it.
you take it apart, tried one screw (1/8 turn each time or less) to find out what screw do what ( write it down) reassemble it, turn it on, mark the wall where the laser is then turn it 180 degree to see if it”s beter or worse than before.
if it didnt do anything, you might have affect another plane on the laser, hope you had it wrote down.
took me between 2 or 4 hour, to figure out everything from how to dismantle it to figure out a way to calibrate it…..I dont fully remember.
once it’s near perfect, you might want to tried something like lock tite on the screw. did not do it but will do it next time.
I dont have time to make a better explanation, if someone have a link of someone who already did it please post it.
you need patience and precision, and it might affect your warranty. so if your not confident in your ability, just bring it to a bosh service center. I did it myself mostly because I like doing this kind of thing and trying to figure out or thing work.