About the Drill Doctor
With over 2 million Drill Doctors sold, you have probably heard about this sharpening system before. Just in case you haven’t, the name implies what this tool will do. It is a Doctor for your drill bits. The Drill Doctor is a drill bit sharpening system for your drill bits.
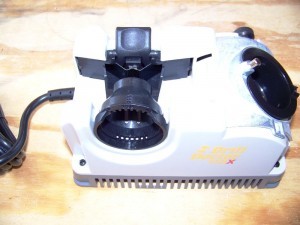
Drill Doctor is owned by Professional Tool Manufacturing LLC. They offer four models – DD350X, Xp Series, DD500X and the DD750X. So there is a model for any type of user. For this review we will be focusing on the 750X as that was the model we tested.
The 750X is their top of the line model and for want you get, it is well worth the extra couple of dollars, as it will perform more functions than the other models. Here are just a fraction of the features on the Drill Doctor 750X:
-
Custom point 115 – 140 degrees
-
Preset 118 point
-
Preset 135 point
-
Replaceable diamond wheel
-
Back-Cut split points
-
Sharpens 3/32″ to 3/4″ bits
-
Adjustable material take off
-
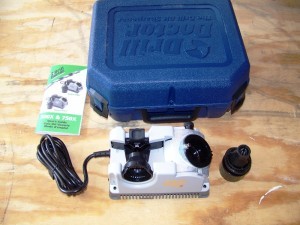
Carrying case
At this point you might be asking yourself why would I spend money on this system? Well, there are a couple of reasons. First, all the old dull or broken bits you have been keeping around, you can now bring them back to life very easily. The Drill Doctor will sharpen High-Speed Steel, Carbide, Cobalt, Tin-Coated and Carbide-Tipped Masonry bits. Second, with how much drill bits can run, you don’t have to keep buying new bits all the time. A good 30 piece Cobalt set can run $100 and an SDS Max bit can run $15 and up for one small bit. Overall this system will save you money in the long run.
The main reason you would want to invest in the Drill Doctor is something you don’t see and that is to prolong the life of your drill. Just as a good chefs will sharpen their knifes, you should sharpen your drill bits before each major project. Besides a dull bit producing poor quality work, a dull bit will cause more wear and tear on your drills. You have to remember a drill is only a power tool that creates power and spins the bit. The bit is what actually does the cutting. A dull bit takes more power and work to make a cut than a sharp bit. If your drill is requiring more power, that means it creates more work and more heat for your drill. Now I am not saying if you use a drill bit one time, your drill is going to clunk out on you, but over time it does have an effect. It is very important to maintain sharp bits, just as it is important to maintain sharp saw blades when cutting wood.
You might be asking yourself if I sharpen my bits all the time, won’t this just eat away the bit and soon I will have nothing left. Well, yes to an extent, but it would take a very long time. With the 750X you have the capability to use the adjustable material take off, so you have complete control of how much material you want to remove. This lets you fine tune the sharpening process and will make your bits last even longer.
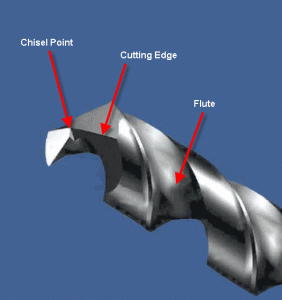
Believe it or not, sharpening a bit is very precise and needs to be. Again, an improper drill bit that is not sharpened correctly will cause more wear and tear on your drill. Say you have a dull drill bit and part of the drill bit material is covering up a portion of the flute. If part of the flute is covered up, then the material you are drilling into will not be able to be brought to the top of your work and the hole will not be cleaned out while you are drilling. So in essence you will not only be cutting the hole you are drilling into, you will also have material that was cut sitting in the hole which will cause more friction and forces the drill to cut that material over and over. As we said, there is a lot to sharpening a drill bit. The chisel point, which is the center point on the tip of the drill bit, must be perfectly centered. The angle between the chisel point and the cutting edge must be proper for each application. You must also have a proper downward angle away from the cutting edge.
Thinking about all that needs to be in place for a proper drill bit, its amazing you can even sharpen one. The Drill Doctor has taken away all of the guessing game. Their system is great and very easy to use. You don’t have to worry about the chisel point being proper, the cutting edges being just right or anything else. The Drill Doctor takes care of all this for you. All you have to do is set the bit and rotate. Everything else is left up to the Drill Doctor.
The Review
We noted above some features and benefits of the Drill Doctor. When we first opened the Drill Doctor 750X, everything was pretty much ready to go.
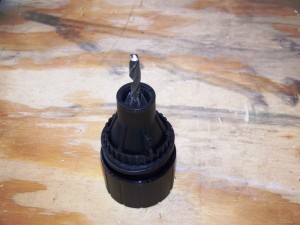
Sharpening a drill bit is a snap. First you insert the shank of the bit into the chuck. One item we noticed were the chuck jaws that actually grab the shank. The jaws are very long, so there is no messing around. Once you tighten the chuck, the bit is always straight. After the bit is tightened (don’t fully tighten as you will need some wiggle room to make the adjustment) into the chuck, you press down the alignment button and insert the chuck into the alignment port. This is also the stage where you can adjust the material take off. When you release the alignment button, two clamps come down and pull the bit in the proper position. Now that the bit is in the proper position, you set the correct depth by either pulling or pushing the bit so it is flush against the drill stop. It takes longer to read the last couple of sentences than it does to actually adjust the bit.
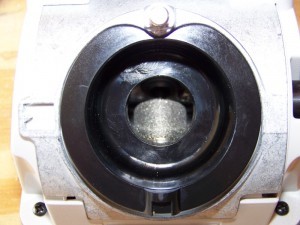
Once the bit is adjusted to the proper setting, you tighten down the chuck and insert it into the sharpening port. You want to make sure the Drill Doctor is turned on before inserting it into the sharpening port. Now all you have to do is hand turn the chuck and the machine does the rest. It is that easy. After you are done and the bit is sharpened, you can add a split point by inserting the bit into the split port.
Masonry bits are just as easy, but they do require a couple of different steps in terms of lining up the bit and the actual sharpening process, but again they are just as easy to sharpen.
For the video we showed how easy it was to sharpen a twist and Masonry drill bit. What we did is take both bits and grinding them down. With the twist bit, we grinded away the Chisel point and cutting edges, so it was more or less a flat bit. For the masonry bit, we grinded away all the cutting edges and made them flat. As you can see from the video, the twist bit came out looking new. We also showed the before and after and how it would cut through wood. Before, the bit just ran across the wood before it grabbed and started cutting. Again, this basically had a flat bottom. We did have to put more pressure in order for it to catch and start drilling. After, it ran through the wood like it was a new bit that we just took out of the packaging. With the masonry bit, we had to put a lot of pressure on the drill. Now it still would have cut through the material, but again much slower and more wear on the drill. After we used the Drill Doctor, the bit was like new.
One note on the video. We were going to show a third bit that we sharpened with the Drill Doctor, but Youtube only allows 10 minutes of play, so we had to cut that out. As you can see with the first bit we sharpened, it might as well have been broken. We took that bit to a grinder and made the bottom as flat as possible.
Final Thoughts
The Drill Doctor is a very easy way to sharpen drill bits. All in all we sharpened over 40 bits of different materials, sizes and types of drill bits. The Drill Doctor handles every one very smooth and turned out basically a brand new drill bit. Even after all the sharpening we did, the Diamond wheel still looked like it was new. We couldn’t find any stats about how many drill bits it will sharpen before replacing, but we can only assume that the life of the wheel is extremely long. This system was very easy to learn and use. Again, we would go with the DD750X, for the couple of extra dollars you will spend on the top line model you get the ability to sharpen up to 3/4″ bits, custom point and the adjustable material take feature. If you really feel you will never use these extra options, they do make other models that will do the trick and they don’t cost as much. We feel the Drill Doctor is a great bargain when you consider all the money you can save. You don’t have to buy drill bits all the time, you can produce better quality work and you can save in the long haul against wear and tear on your drills.

Man, I’ve almost bought one of these several times, just never did. I do want one though.
It takes some practice!
In the little blue picture, where you point to the different parts of the bit, if the arrows are correct, this is a left hand bit. The Dr. will sharpen left hand bits???
You can get an accessory that does left hand bits :}
In my opinion the new style Drill Dr. is not to my liking and is far more difficult to use than the old 750 model.
I bought the new 750X because I could not get parts for my old one, which I have used for MANY years and it did a great job. If you have never used the old model you will not understand, as the 750X has some negative things about it. First it is not as easy to rotate the bit chuck because of the angle the new one has, the alignment set up is more complicated, compared to the old one. Although not hard to understand, just more steps involved, The on off switch is not in a convenient place. The power cord is so stiff especially in cold weather that it will almost stick straight out, not easy to coil up for storage.
I lucked out and found an old 750 at a flea-market that had never been used, works great, would not trade one of these for 10 of the new ones.
As I said this is just my honest opinion of the new 750X
Hey, Jim! Thank you for your feedback! I am sorry you weren’t a fan of the newer model, I didn’t experience any issues with the power cord, and the alignment takes a bit to get the hang of, but once I did it wasn’t bad. I am glad you found a model that better suited your needs though!
I purchase the 750X and am bitterly dissappointed, I have watched the dvds instructions and read the manual. nothing seems to work, spent a day trying different things, and all I get is drills which will not drill maybe if I put enough pressure on my drill press I will be able to burn my way through. Ha ha.
it will not grind a chisel point and not allow me to back grind to a finer point. I have wasted my money Sadly I have owned this machine for several years and had not got around to using it, until a few days ago.
totally pissed-off. I have replaced the grinding cylinder thinking that may be the problem to no avail. upon closer inspection, found the motor shaft has side-play in it. aprox 2 to 5 thousands of an inch and what even surprised me more the motor only has bushing in it no bearings which says heaps about the machine, Not meant to last at all, no wonder they sell millions of them. Now the machine Was brand new up until a few days ago. In my opinion cost of manufacture would be very little compared to what we pay. I live in Australia and it seems to me, in America,, Greed Is Good., hence send out a third rate product and make the max profit. Isn’t capitalism great, Make money at all cost and don’t give a damm about ripping people off.
I know in which country I would rather live. AUSTRALIA.
I just got a 750x and it completely ruined the first two bits I tried to sharpen. Yes I read manual
Drill Doctor provides excellent support if you’re having trouble, reach out to them at 1-800-418-1439 and they will walk you through how to get great results!
I have three sized cobalt bits, standard spiral (3/8″, 1/2″ and 5/8″), all 135 degree split points. Out of package, all the drills worked drilling through stainless; used them in progression to get 5/8″ holes. after sharpening many time (following the Drill Doctor instructions), none of the bits will drill the stainless, can’t get any bite at all, even right out of the sharpener. Any tips to get better bite out of the bits???